No products in the cart.
Winter Shadow Details by Charles D. Gandy
More times than not, we knitters take the pattern we are working on for granted—and rightfully so. We assume that the pattern has been written by a competent designer who has crossed all the t’s, checked all the numbers, and presented a pattern that is well designed, well written, well edited, and test knitted.
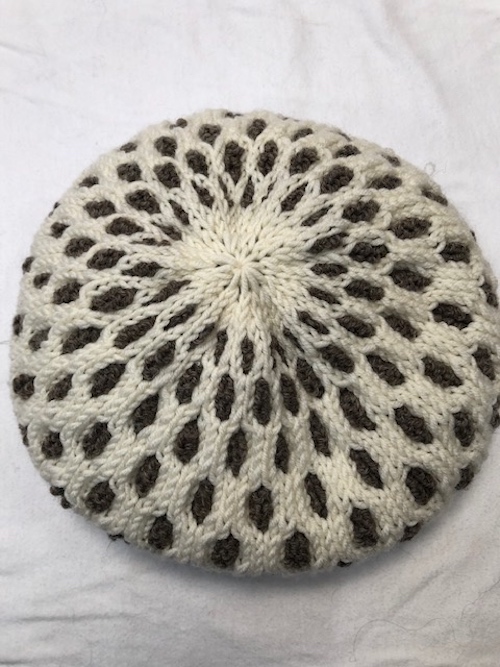
My Winter Shadows hat is one example. I believe the final version is a very simple, straightforward hat pattern that allows the honeycomb cable to “grow” from an interesting rib pattern. The crown of this hat gently tapers to a rounded conclusion with an ease that doesn’t break the rhythm and flow of the cable pattern below.
First Attempt
Look at my first attempt at this hat. At first glance, you might think it’s not a bad-looking hat. However, on closer inspection, you might ask, “What was he thinking?” I wasn’t! When working with cables, I aim to ensure that those cables grow out of the ribbing—or even become part of the ribbing. I first became aware of this sensitive detail when researching Aran sweaters for the design of my Master Hand Knitting Level 3 sweater. I was particularly fascinated by the work of Alice Starmore, a prolific Scottish knitter and author who emphasizes this technique like no other. So why, I now ask myself, did I cast on a simple 2×2 rib and proceed to work a 4×4 cable pattern out of that rib? And if seeing that lack of attention to detail in the ribbing wasn’t bad enough, look at the crown decreases. What is that single stitch that is stretched across to join a double stitch doing there? It looks like a mistake or an afterthought . . . or no thought at all.

Second Attempt
Instead of making another complete hat, I did what I should have done first: I began to swatch. In my first swatch, understanding that I was working with a multiple of 8 stitches (4 knit stitches floating in front and 4 purl stitches in back), I decided to make my repeating rib pattern as p2, k4, p2. Yes, that seemed to work better. On the first round after the ribbing, 2 stitches from the 4 knits would be split above the rib purls to form the first cable and would grow nicely out of the rib. However, that pesky stranding of my purl yarn was still there. So, in my constant quest of going from good to better, I decided to try yet another swatch.

Third Attempt
For this swatch, I decided to refine the ribbing a bit more by adding a purl stitch between the four knits, thus repeating the pattern became k2, p1, k2, p3. This would maintain the same multiple of 8 but with a bit more finesse. Unfortunately, for some strange reason, I used a larger yarn in this new swatch so the comparison of swatches two and three is not as easy to see. One minor, but important, difference between the two is that the stranded yarn of the purl stitches tends to disappear more in the third swatch.

A New Hat
After these swatches, I felt prepared to knit a second version of the hat, incorporating the details that I had worked on in my swatches for the ribbing, and I would work out the crown decreases directly as I knitted the hat. See how much better this looks than the crown of the first hat. But wait! Do you think I documented these decreases? (I did not.) That would be far too logical and easy. Oh . . . and take a look at the ribbing. Notice anything? I worked the new ribbing, incorporating the single purl stitch between the four knit stitches but when I began the reverse stockinette stitches (purls), I did not follow the pattern I had painstakingly worked out on swatch three. In the big picture, this version looks fine, but I like the look of how I did it in the swatch and the way it appears on the finished hat.

Swatch 4
Because I failed to document my decrease pattern on my second hat, I decided I should swatch and note the decreases that I had supposedly already worked out—easier said than done. My first attempt at recreating these decreases just didn’t work. After yet another swatch, I was finally satisfied with my decrease pattern, and this time I recorded exactly what I did.


So, I made the final hat, in a larger size, and knitted it as the pattern is written. Finally, I have a finished pattern.

Copyright 2021, The Knitting Guild Association, Cast On Summer 2021, All Rights Reserved
0 Comment