No products in the cart.
Swarm of Wasps Top by Arenda Holladay
 Beyond the Pattern
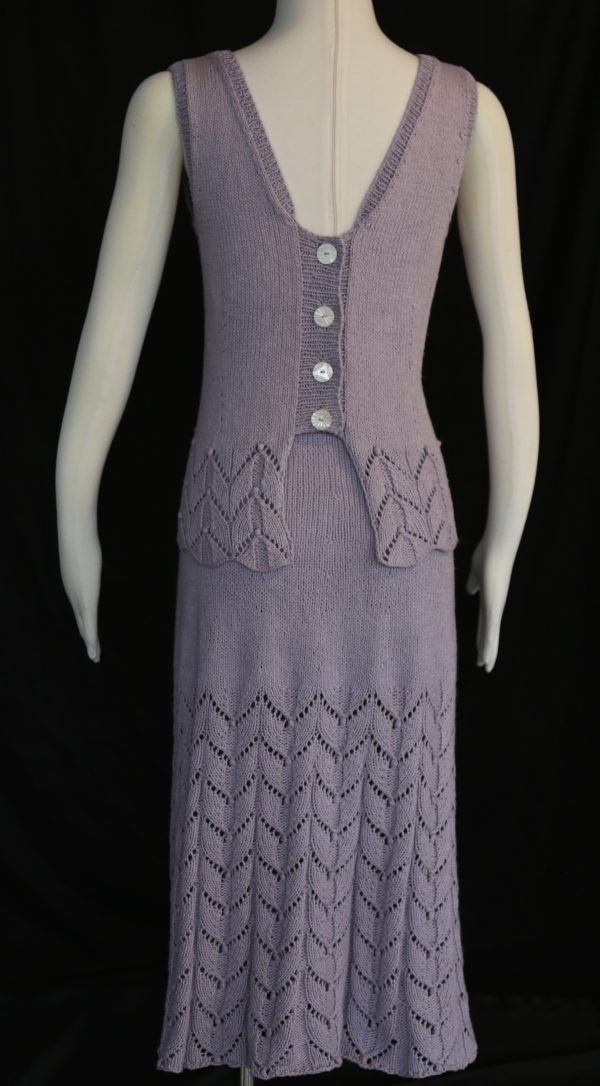
This top accompanies the Swarm of Wasps Skirt . The Wasp Wing Lace is at the bottom edge and if you compare it to the skirt, you will notice that the “wasps” are climbing up the top. The lace pattern is worked top down on the skirt and bottom up on the top. The charts for the lace pattern are not interchangeable since the pattern is different when worked in the round. A double decrease is used at the top of the wasp. When worked flat, it is on a WS row, so a purl version of the decrease must be used. The top is worked in one piece to the armholes when it is divided for the backs and front.
DESIGNER NOTE – The top has waist and bust shaping. If you want the top looser, omit those instructions in the pattern.
 Sizes
Sizes
XS (S, M, L, 1X, 2X)
Finished Measurements
Bust: 33 (36, 39, 42, 45, 48)”
Length: 23 (23, 24, 24, 25, 25)”
Length: 23 (23, 24, 24, 25, 25)”
Materials
Classic Elite HANAKO (100g/3.53oz, 220yds/201m, 50% Cotton, 50% Linen): 3 (4, 4, 5, 5, 6) skeins #5656 Thistle
Sizes 4 (3.5mm) and 6 (4.0mm) needles
Stitch markers
Four 3/4″ Buttons
Sizes 4 (3.5mm) and 6 (4.0mm) needles
Stitch markers
Four 3/4″ Buttons
Gauge
In St st, 19 sts & 31 rows = 4″/10cm.
In Wasp Wing pat, 20 sts & 32 rows = 4″/10cm. To save time, take time to check gauge.
In Wasp Wing pat, 20 sts & 32 rows = 4″/10cm. To save time, take time to check gauge.
Abbreviations
Inc1R – Right slanting lifted increase. Knit into the purl nub below the next stitch; then knit the stitch.
Inc1L – Left slanting lifted increase. Knit the stitch; then knit into the purl nub below the stitch just worked.
PDD – Purl double decrease. P2tog, slip the next stitch knitwise and return it to the left needle (this adjusts the mount of the stitch). Slip the stitch you just purled together back to left needle. Pass stitch to the left of the stitch just worked over this stitch. This video shows how to work this decrease: Purl Double Decrease
Bobble – Knit in front of st, knit in back, knit in front; turn, p3tog.
Chart
See Wasp Wing Chart
DESIGNER NOTE – The lace at the bottom of the top is not included in the button bands. Since the selvedges are “raw” edges, a selvedge treatment should be used, so the first stitch of each row should be slipped purlwise. Once the lace is complete, the selvedge stitches should be worked normally to provide stability to the bands.
TECHNICAL TIPS – Notice that the double decrease is worked on the WS of the piece. This is the purl version of the S1K2P decrease. It is necessary to adjust the mount of the slipped stitch or the decrease will be twisted. See Abbreviations for a link to a video demonstrating this decrease.
When making the bobble, work the stitches loosely so that it will be easier to purl them together. If you make the stitches tight it will be very difficult to purl them together.
Top
Using larger needles, CO 157 (171, 185, 199, 213, 227) sts.
Est Pat (WS): Sl 1,*k1, p5, k3, p5; rep from * to last 2 sts, k1, p1.
Next Row (RS): Sl 1,work sts from Wasp Wing Chart 11 (12, 13, 14, 15, 16) times, p1, k1. Cont to work in pat as est, working a total of 3 repeats of the Wasp Wing Chart. Work 0.5 (0.5, 1, 1, 1.5, 1.5)” in St st, ending on WS row.
Est Pat (WS): Sl 1,*k1, p5, k3, p5; rep from * to last 2 sts, k1, p1.
Next Row (RS): Sl 1,work sts from Wasp Wing Chart 11 (12, 13, 14, 15, 16) times, p1, k1. Cont to work in pat as est, working a total of 3 repeats of the Wasp Wing Chart. Work 0.5 (0.5, 1, 1, 1.5, 1.5)” in St st, ending on WS row.
DESIGNER NOTE – Four darts are worked at the front and back of the top. To ensure that the placement of the darts is consistent, markers are placed at the locations.
TECHNICAL TIP – The decreases which shape the waist are mirrored. Ssk decreases are worked after the markers and k2tog decreases are worked before the markers.
Shaping the Waist
K17 (20, 23, 26, 29, 32), pm, k40, pm, k43 (51, 59, 67, 75, 83), pm, k40, pm, 17 (20, 23, 26, 29, 32).
Dec Row: *Knit to marker, ssk, k to 2 sts before next marker, k2tog, k to 3rd marker, ssk, k to 2 sts before next marker, k2tog, k to end. Work 3 rows in pat as est; rep from * 4 more times – 137 (151, 165, 179, 193, 207) sts. Work 0.75″ in St st, ending on WS.
DESIGNER NOTE – Once the decreases have been made for the waist shaping, increases are made to shape the shell for the bust. In the pattern, only 0.75″ is worked after the decreases before beginning the increases. If you have a longer waist, you may wish to work additional rows of stockinette. Once the increases are complete, the markers indicating the darts are removed.
TECHNICAL TIP – The increases which shape the bust are mirrored. Right slanting increases (Inc1R) are worked after the marker and left slanting lifted increases (Inc1L) are worked in the stitch before the marker.
Increase Row: *Knit to first marker, Inc1R, k to one st before marker, Inc1L, k to next marker, Inc1R, k to next marker, Inc1L, k to end. Work 3 rows in in pat as est; rep from * 4 more times– 157 (171, 185, 199, 213, 227) sts, ending on a RS row. Be sure all markers are removed. Work in pat as est until piece meas 14 (14, 14.5, 14.5, 15, 15)” from CO edge, ending on a RS row.
DESIGNER NOTE – Markers are placed to indicate the center of the armhole opening. Once stitches have been bound off for the armholes, it is necessary to work the right and left backs and front separately. Yarn management is easier if they are worked separately. The back neckline shaping begins at the same time.
Divide for Front and Backs
Next Row (WS): K37 (40, 43, 46, 49, 52), pm, k83 (91, 99, 107, 115, 123), pm, knit to EOR. Work to 5 sts before marker, BO 10, work to 5 sts before next marker, BO 10, work to EOR.
 Right Back
At the armhole edge, BO 3 sts twice and then dec 1 st every 6th row 3 (5, 7, 9, 11, 13) times and AT THE SAME TIME, dec 1 at the neckline edge every 4th row 13 (14, 15, 16, 17, 18) times – 10 sts rem. Work in pat as est until the piece meas 9 (9, 9.5, 9.5, 10, 10)” from armhole edge. BO.
Left Back
Work as for Right Back reversing all shaping.
DESIGNER NOTE – Before binding off for the armholes on the front, place markers or safety pins on either side of the center stitch. Count 41 (45, 49, 53, 57, 61) on either side and place the markers on both sides of the next stitch.
Front
At the armhole edges, BO 3 sts twice and then dec 1 st every 6th (6th, 4th, 4th, 4th, 4th) row 3 (5, 7, 9, 11, 13) times – 55 (59, 63, 67, 71, 75) sts. AT THE SAME TIME, when the piece meas 5 (5, 5.5, 5.5, 6, 6)” from the armhole, work to 5 sts before center st, BO 11. At neck edges, BO 5 (6, 6, 7, 8, 9) sts twice and then BO 1 st 2 (2, 4, 4, 4, 4) times – 10 sts rem on each shoulder. Armhole meas 9 (9, 9.5, 9.5, 10, 10)”. BO.
Finishing
Block all pieces. Sew the shoulder seams. Using smaller needles, pick up sts along armhole edge. Work in K1P1 ribbing for 0.5″. BO. Repeat for other armhole.
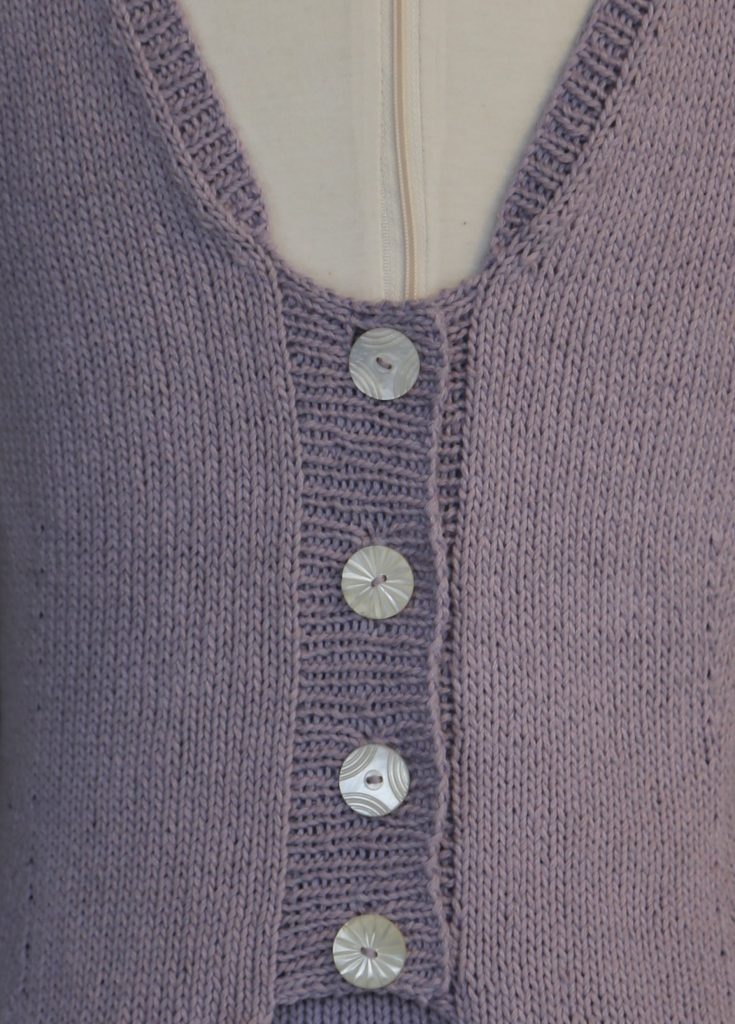 DESIGNER NOTE – The buttonhole and button band begin at the neck shaping. Since there is not a clear demarcation of where the neckband ends and the buttonhole/button band begins, the final product will look better if you slightly taper the neckband close to the button bands (see photograph of the top back). To do this, stitches are picked up for the neckband first, beginning at the first decrease for the neck. Short rows are then worked for the band at both edges.
Using smaller needles, pick up stitches along the neckline edge beginning at the first decrease for the left back neckline. Work in K1P1 ribbing, working short rows by leaving one st at each end before turning. Work until band meas 0.5″. BO.
Button Band – On right back, using smaller needles, pick up sts beginning at the end of the neckband to the slipped stitch selvedge of the lace. Work in K1P1 ribbing for 1.5″. BO.
Buttonhole Band – Pick up sts as for the button band. Evenly space 4 buttonholes horizontally and vertically on the band. One-row horizontal buttonholes are recommended. If you have not worked this type of buttonhole before, refer to this blog entry: Horizontal Buttonholes
Sew buttons in place. Weave in all yarn tails.

Copyright 2017, The Knitting Guild Association, Cast On Summer 2017, All Rights Reserved

0 Comment