No products in the cart.
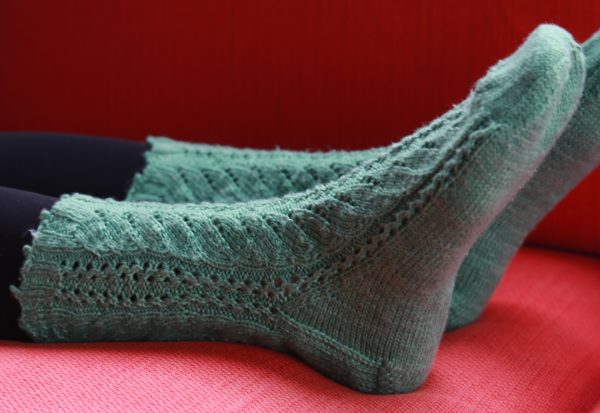
Spring at Last! By Pamela Haswell
 Beyond the Pattern
Even though we’ve had a warmer than usual winter here in the Texas Panhandle, spring is still a welcome prospect. The picot cast on reminds me of new growth peeking out through the ground, and the leafy design that works its way down the leg and foot tells of new growth to come. The spring green colorway seals the deal, making these socks perfect for heralding a new season.
Sizes
M (L)
Finished Measurements
Foot circumference (unstretched): 8 (9)”
Materials
RedFish DyeWorks SILK SOCK (420yds/384m, 100g/3.53oz, 75% Superwash Merino, 25% silk): 1 skein #Gb12a (green)
For Size M, size 1 (2.25mm) circ needles (2) or size needed to obtain gauge
OR
For size L, size 2 (2.75mm) circ needles (2) or size needed to obtain gauge
For Size M, size 1 (2.25mm) circ needles (2) or size needed to obtain gauge
OR
For size L, size 2 (2.75mm) circ needles (2) or size needed to obtain gauge
Stitch markers
Tapestry needle
Tapestry needle
Gauge
In St st on smaller needles (for Size M), 36 sts & 52 rnds = 4”/10cm.
In St st on larger needles (for Size L), 32 sts & 44 rnds = 4”/10cm.
To save time, take time to check gauge.
In St st on larger needles (for Size L), 32 sts & 44 rnds = 4”/10cm.
To save time, take time to check gauge.
Abbreviations
BOR – beginning of round
Special Techniques
Knitted Cast On: Make a slip knot about 6” from the end of the yarn. The slip knot counts as the first stitch. Knit 1, leaving the stitch on the LH needle. Turn the RH needle to the right so that both tips point toward the right and slip the new stitch onto the LH needle knitwise. Repeat until the required number of stitches are on the LH needle.
Picot Cast On: *Using Knitted Cast On method, CO 7 sts. BO 3 sts. Slip the stitch from the RH needle back to the LH needle knitwise. Knit cast on another 2 sts. There are 6 sts on the LH needle, with one picot between the 3rd and 4th sts. Repeat from *.
Cuff
Using the Picot Cast On method, CO 72 sts. Join to work in the rnd, taking care not to twist the sts. Divide the sts so that there are 36 sts on the instep needle and 36 sts on the heel needle.
Following the Ribbing chart, work 1.25” of ribbing, measured from the base of the picots.
Leg
Begin the Leg chart and work until the leg is about 2” less than the desired leg length from the base of the picots and ending with Rnd 6.
Work Rnd 7, placing a marker after the 4th st on each needle to mark the new BOR. Rearrange the sts so that the BOR comes at the start of one needle. (This will be the heel needle.) There are now four sts between the BOR and the point where the working yarn is attached. Slip those sts back to the LH needle and work them as p1, k2, p1.
Work Rnd 8 of the Instep chart across the instep sts only.
DESIGNER NOTE – Most socks are worked with the instep stitches on one needle and the sole stitches on the other. To allow the zigzag pattern that runs down each side to continue without a jog, the Leg chart begins with the narrow panels. The BOR is moved after working the leg so that the center panel will be centered on the instep.
Heel Flap
The heel flap is worked back and forth across the 36 sts on the heel needle.
Row 1 (RS): *Sl 1 wyib, k1; rep from * to end.
Row 2 (WS): Sl 1 wyif, p to end.
Rep Rows 1 & 2 another 17 times.
Row 1 (RS): *Sl 1 wyib, k1; rep from * to end.
Row 2 (WS): Sl 1 wyif, p to end.
Rep Rows 1 & 2 another 17 times.
Heel Turn
Row 1 (RS): Sl 1 wyib, k19, ssk, k1. Turn.
Row 2 (WS): Sl 1 wyif, p5, p2tog, p1. Turn.
Row 3: Sl 1 wyib, k6 (to 1 st before the gap), ssk, k1. Turn.
Row 4: Sl 1 wyif, p7 (to 1 st before the gap), p2tog, p1. Turn.
Repeat rows 3 and 4, working one more st before the decrease on each row, until all heel sts have been worked. On the last RS row, skip the final k1; on the last WS row, skip the final p1 – 20 heel sts rem.
Gusset
K10, pm for new BOR, k10.
Pick up 18 sts along the edge of the heel flap in the slipped sts, then pick up one more st at the base of the heel flap, to minimize any gap.
Pick up 18 sts along the edge of the heel flap in the slipped sts, then pick up one more st at the base of the heel flap, to minimize any gap.
Work across the instep needle in pat as est.
With the heel needle, pick up 1 st at the base of the heel flap, to minimize any gap, then pick up 18 sts in the slipped sts along the other edge of the heel flap. Knit to marker.
 Foot
Foot
Rnd 1: Knit until 3 sts rem on the sole/heel needle, k2tog, k1. Work instep sts following Instep chart, beg with Rnd 1. On the sole needle, k1, ssk, knit to BOR.
Rnd 2: Knit to end of sole needle, cont instep in pat, knit to BOR.
Rep Rnds 1 and 2 another 10 times – 72 sts (36 sts on the sole needle and 36 sts on the instep needle).
Cont in pat as est until the foot is about 2” shorter than desired length, ending with an even-numbered rnd. On the last rnd, remove the BOR marker and knit to the end of the sole needle.
Toe
Rnd 1: *K1, ssk, k until 3 sts rem, k2tog, k1; rep from * on second needle.
Rnd 2: Knit.
Rep these 2 rnds another 7 times – 20 sts on each needle.
Work only Rnd 1 four more times – 12 sts on each needle.
Rnd 2: Knit.
Rep these 2 rnds another 7 times – 20 sts on each needle.
Work only Rnd 1 four more times – 12 sts on each needle.
Finishing
Graft toe together with Kitchener stitch. Block and weave in ends.

Stitch Pattern Reference (modification)
Knight, Erica (ed.). The Harmony Guides: Lace and Eyelets. Loveland CO: Interweave Press, 2007. p. 52.
Copyright 2017, The Knitting Guild Association, Cast On Summer 2017, All Rights Reserved
0 Comment