Short-Row Sleeve Caps by Donna Estin
Special Topics in Design Winter 2022–2023
Please note that this article does not cover how to design armholes in the body of a garment. The length of the armhole, angle of the curve at the underarm, widths of the underarm and cross-back, and amount of ease used in upper arm all contribute to the sleeve’s overall fit. When designing a garment, decide on the desired fit and look from the beginning, then shape an armhole that will create an even arc at the underarm for each size. With short-row sleeve caps, a close-fitting armhole creates the best fitting sleeve.
What are Short-Row Sleeve Caps?
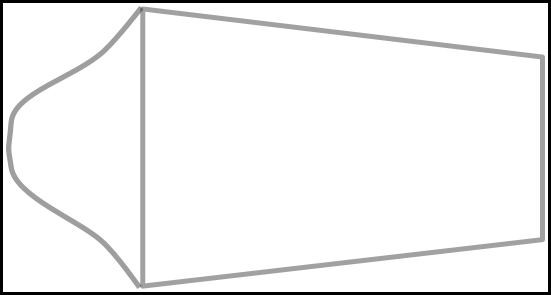
A sleeve cap forms a bell curve and fits into the armhole of the body of a garment (see Figure 1). With a traditional set-in sleeve worked from the bottom up, the sleeve cap begins with stitches bound off at the underarm, then decreased or bound off gradually to shape the sides of the cap, and more aggressively at the top.
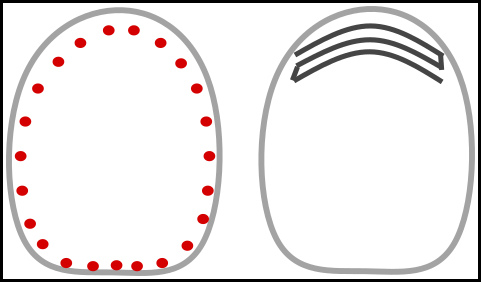
With short-row sleeve caps, stitches are picked up around the armhole, then the cap is worked flat, back and forth, using short rows beginning at the upper cap and worked top-down, continuing until all stitches around the armhole have been worked. In Figure 2, the diagram on the left shows red dots representing stitches picked up around the armhole. The diagram on the right shows the direction in which short rows are worked.
Benefits of Creating Short-Row Sleeve Caps
With set-in sleeves, if your row gauge is off, you run the risk that the sleeve cap will be larger or smaller than the armhole, and puckering of fabric can occur. By shaping a sleeve cap with short rows, the sleeve cap fits better. You start with the circumference formed by the body and work within that area to build a cap.
The finishing around the armhole can look very neat with this method, especially when stitches are picked up properly and evenly.
This method can be used with bottom-up or top-down garments. In most existing patterns, it can also be substituted for set-in sleeves worked flat by working the body as written, then re-designing the sleeve cap to be worked from the top down.
Parts of a Sleeve Cap
When building a cap with short rows (Figure 3), we focus on three parts of a sleeve cap: 1) the upper cap, 2) the middle cap, 3) and the lower cap.
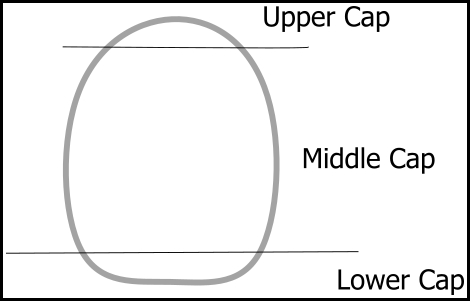
The upper cap width is about 20–25% of the circumference of the upper arm. Elizabeth Doherty recommends starting with 20% (see Example A). Shirley Paden recommends 1/4 of the upper arm circumference less 0.25” (see Example B). These end up being very close to each other. The below examples are for a woman’s large sweater with a stitch gauge of 5 stitches to 1”.
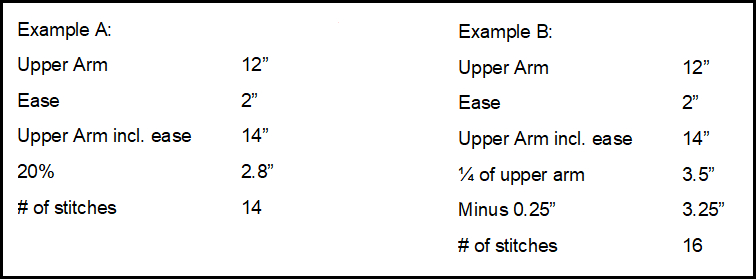
Both examples yield numbers that are very close to each other, so play around with your stitch multiples and decide what is best for your design.
Placing Markers Around the Armhole
Short-row sleeve caps involve working short rows to specific end points. Before we pick up stitches, let’s put removable markers (split-ring markers, safety pins, or tie a piece of scrap yarn—whatever you have handy) in place around the armhole to make the next process go smoother.
Underarm
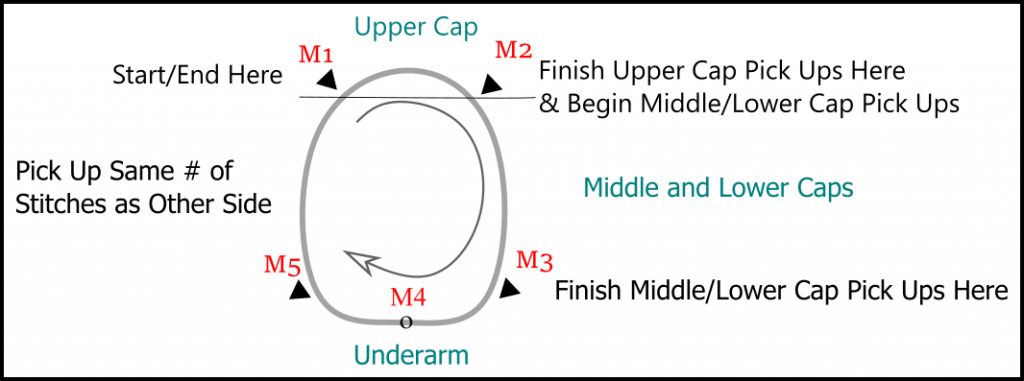
Across the bottom of the armhole, you will see a straight line of bound-off stitches (for bottom-up) or cast-on stitches (for top-down) that make up the underarm stitches. Place a marker at the center of the underarm (M4), then one to the right (M3) and one to the left (M5) to mark off the underarm stitches. Make sure the same number of stitches are on each side of the center of the underarm. See Figure 5 below.
Upper Cap
Center the top of the sleeve cap at the shoulder seam. If you’re designing a seamless garment, pretend you have a shoulder seam. Half of the top of the sleeve cap will lie on the back side of the shoulder seam and half to the front side of the shoulder seam.
Half of Example A: 1.4”
Half of Example B: 1.6”
See how close these two examples are?
Using Example A, measure 1.4” to the left of the shoulder seam and place a marker (M1), then measure 1.4” to the right of the shoulder seam and place a marker (M2). For heavy garments, or those with drape, hold the garment up by the shoulders, then measure and mark the lengths. This will better resemble the garment as worn, as opposed to lying your sweater flat and measuring.
Picking up Stitches Around the Armhole
When picking up stitches, if you use a needle one to two sizes smaller than your working needle, you minimize the amount of disruption with each stitch. If you do choose to use a smaller needle to pick up your stitches on the initial round, transfer the stitches to your working needle before you begin working the short rows to avoid juggling two needles throughout.
Upper Cap
Since we’re building the sleeve cap from the top down, instead of starting at the center of the underarm, begin picking up stitches for the top cap. In Figure 5, the marker to the left of the shoulder seam (M1) is where we begin. Pick up the upper cap stitches across the shoulder seam to M2. Remove this marker and replace with a closed ring marker. Using Example A, we are picking up 14 stitches between both markers.
Since there are more rows to stitches, if you count the number of rows between the markers, you’ll end up with more than the 14 stitches you need to pick up.
Example C:
Upper Cap 2.8”
Number of stitches: 14 (based on stitch gauge of 5 stitches to 1”)
Number of of rows: 19.6, rounded to 20 (based on row gauge of 7 rows to 1”)
You want to work out a good ratio that allows you to pick up 14 stitches evenly across the 20 rows that lie in between the markers.
Mid and Lower Caps
Stitches will be picked up for the mid and lower cap between M2 and M3. To calculate how many stitches to pick up, we first need to look at how this type of sleeve fits into the sweater.
Short-row sleeve caps resemble set-in sleeves, and the sides of the sleeve cap join the body at an angle (right diagram), as opposed to a drop shoulder sleeve (left diagram).
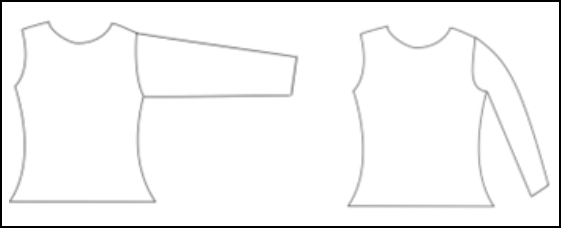
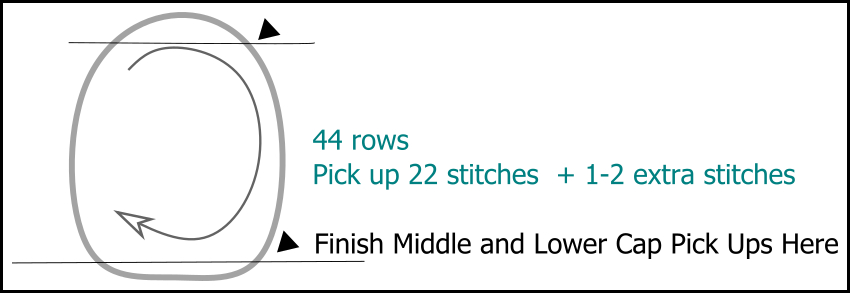
When you pick up stitches along the body of a drop-shoulder sleeve, you pick up the number of stitches based on the stitch gauge of your sleeve. Since set-in sleeves are slanted, this ratio is changed. You will pick up about 50% of the available stitches plus 1 or 2 extra stitches, in the mid and lower caps in order to have the sleeve cap angled nicely without puckering or stretching. If you have 44 rows in the middle and lower cap area, you will pick up 22 stitches plus 1 or 2 extra stitches. Let’s use 24 stitches for our example.
Underarm
Pick up one stitch for each underarm bind-off or cast-on stitch.
Completing the Pick Up
Once you finish the underarm (M5), pick up the same number of stitches that you did on the other side for the mid and lower cap area. You are now back where you started.
Count your total number of stitches
14 sts Upper Cap
24 sts Mid/Lower Cap
16 sts Underarm
24 sts Mid/Lower Cap
78 sts Total
This is the total number of stitches around the armhole. Once we finish shaping the sleeve cap, the number of stitches on the needle needs to equal the upper arm stitches. Don’t let these numbers become confusing. They are different, and the armhole will have more stitches than the upper arm.
In Example A, the upper arm is 14” (x 5 stitches per inch = 70 stitches).
78 armhole stitches–70 upper arm stitches = 8 stitches to be removed.
This means we need to remove 4 stitches on each side (front and back of sleeve) by the time we finish the short rows. These are removed in the lower cap and are shown below in Forming the Lower Cap.
Forming the Upper Cap
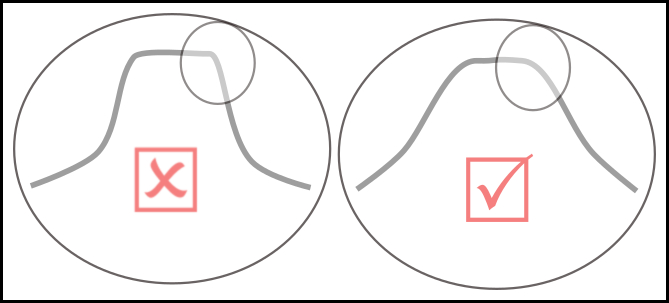
Now that we know how many stitches to pick up in each section, it’s time to build the cap. The top cap is worked flat across, then the middle cap forms an angled slant downwards. To prevent a point from forming between the two, we will create a little curve to soften this edge. We do this by slipping an extra stitch before the wrap and turn (w&t).
Our example is worked on a stockinette fabric. If you’re working in a textured pattern, lace or with cables, begin working in pattern on the next row. If the stitch pattern combines well with stockinette, you may want to work the first inch—or through the end of the top cap—in stockinette before transitioning to your stitch pattern so the knitter has time to get used to the short rows.
Short Row 1 (RS): Knit to marker, remove marker, wrap and turn (w&t). You may wish to place a locking stitch marker on the wrapped stitch if you have difficulty seeing it.
Short Row 2 (WS): Purl back across to the starting marker, remove marker, w&t. Again, you may wish to place a locking stitch marker on the wrapped stitch. If you can tell which stitch is wrapped, then don’t fiddle with markers. There are now three markers remaining; one in the center of the underarm, and one on each end of the underarm stitches.
Short Row 3 (RS): Knit to wrapped stitch, knit the wrapped stitch, slip 1 st with yarn in front, take the yarn to the back and wrap the next stitch by working a w&t.
Short Row 4 (WS): Purl to wrapped stitch, purl the wrapped stitch, slip 1 st with yarn in back, bring yarn to the front, w&t.
In Short Rows 3 and 4, we have an extra slipped stitch (in bold). Repeat Short Rows 3 and 4 once more. This creates that softer curve at the top that I was referring to (see Figure 8).
Forming the Mid Cap
Once our top cap is finished, we continue to shape the mid cap with short rows, without the slipped stitch, like this:
Next Short Row (RS): Knit to wrapped stitch, knit the wrapped stitch, w&t.
Next Short Row (WS): Purl to wrapped stitch, purl the wrapped stitch, w&t.
Continue to repeat the last two short rows throughout the mid-cap.
Finding that Imaginary Line between Mid Cap and Lower Cap
But where does the mid-cap end and the lower cap begin? Remember we started with 78 stitches around the armhole and need to finish with 70 stitches for the upper arm circumference: 78–70 = 8 stitches or 4 stitches on each side.
We decrease stitches by wrapping 2 stitches together on one row, then working those 2 stitches together the next time we reach them. We need to do this 4 times on each side. In order to k2tog or p2tog 4 times, we need 8 stitches. We are going to work the last decrease together with the first stitch of the underarm, so that leaves 7 stitches on each side. These decreases are worked at the lower cap, to mimic the larger chunk of stitches that are either bound off, decreased, or cast on just outside of the underarm when shaping a set-in sleeve.
So in this example, the answer to our question, “How long do I keep repeating these short rows?” is: until 7 stitches remain before the first underarm marker (M3).
Forming the Lower Cap
Once we have worked short rows until 7 stitches remain before each underarm marker, we begin to double-wrap and decrease like this:
Next Short Row (RS): Knit to wrapped stitch, knit the wrapped stitch, wrap the next 2 sts together and turn.
Next Short Row (WS): Purl to wrapped st, purl the wrapped stitch, wrap the next 2 sts together and turn.
Dec Row (RS): Knit to the double wrapped sts, knit both wrapped sts together as 1 st, wrap next 2 sts together and turn—1 st decreased.
Dec Row (WS): Purl to the double wrapped sts, purl both wrapped sts together as 1 st, wrap next 2 sts together and turn—1 st decreased.
Repeat the last 2 rows until only 1 stitch remains before each underarm marker (M3 and M5). In our example, we repeat these 2 rows once more. We have now decreased 2 sts on each side and have a double wrapped stitch waiting on the needles. Now let’s finish up these short rows.
Dec Row (RS): Knit to the double wrapped sts, knit both wrapped sts together as 1 st, wrap next single stitch, remove marker, and turn—1 st decreased.
Dec Short Row (WS): Purl to the double wrapped sts, purl both wrapped sts together as 1 st, wrap next single st, remove marker, and turn—1 st decreased.
We have now decreased 3 sts on each side and it’s time for the final decrease…the grand finale.
Last Short Row (RS): Knit to wrapped st, k2tog through the back loop with the next st (which is the first stitch of the underarm), knit to center of underarm.
This completes the short rows but we still need to work the final decrease on the other side of the underarm marker.
Dec Rnd: Knit to 1 st before the wrapped st, k2tog (the next st and the wrapped st), knit to end of round.
The sleeve cap is complete. The stitch count equals the upper arm. You can now work your sleeve from the top down to the cuff, in the round, decreasing to taper the sleeve as you normally would. If you’d like to leave a no-shaping zone at the top of the upper arm, which I strongly urge you to do, then work in the round for about one inch before starting your first decrease at the underarm. This allows the sleeve to fit nicely before starting the decreases. If you start decreasing too soon, the upper arm may feel snug since the sleeve never really has any fabric at the full upper arm circumference.
Types of Short Rows
The best short rows for this type of sleeve cap are wrap-and-turn rows. They are the most invisible and they form neat, firm turns.
If you notice, you aren’t picking up the wraps. If you had picked up stitches, worked a round in stockinette stitch, then started your wrap and turns, the wraps would be visible. But by picking up stitches and working them right against the sleeve join, you’re able to leave the wraps alone. This makes the whole thing easier and adds strength at the join.
Making the Numbers Work
The number of stitches picked up around the armhole will be greater than the number of stitches for the upper arm circumference. By the time the short rows are finished, your stitch count needs to equal the number of stitches for the upper arm. If you can’t make the numbers work the way you’d like, then make any slight adjustments on the first round.
Example: If we had 78 stitches for the armhole and needed 68 stitches for the upper arm, but we didn’t want to work more double wraps, we could choose to end at 70 stitches like we did in the above example, then on the first full round of the upper arm, work a decrease at the underarm like this:
Beginning the round at the center of the underarm, K1, ssk, knit to last 3 sts, k2tog, k1. Then work for 1” or more before beginning the sleeve taper decreases.
Different Stitch Patterns
If you’re working a stitch pattern in the sleeve cap, center the stitch pattern over the top cap, between the first two markers. As you build the sleeve cap, you’ll add an equal number of stitches to each side, so your stitch pattern stays centered and is easy to expand upon.
If the stitch pattern is based on an even number of stitches, pick up an equal number of stitches on each side of the shoulder seam for the upper cap. If worked over an odd number, pick up one stitch in the center of the shoulder seam, then an equal number of stitches to the left and right of this.
If you’re placing a center cable, check the stitch gauge for each pattern. I like to pick up the number of stitches based on stockinette around the armhole, then on the first short row, when you begin to knit across the top cap, work increases where the cable will go to account for the extra stitches the cable will use.
Plan Everything in Advance Before Knitting
You don’t want the stitch counts for the armhole to be way off from the upper arm. This method works best if you can keep the numbers manageably close to one another. If your armhole is wide and open, but the upper arm is narrow with very little ease, then design a smaller, more fitted armhole or allow more ease on your upper arm. Work through all of your stitch counts when grading before anything is knit to make sure that each part of the garment—cross-back, armhole, and sleeve cap—will work well together for all sizes.
I hope you like the way your sleeve caps look and fit when designed this way. Pocomoke Pullover (insert link to pattern) uses short-row sleeve caps and accompanies this article.
If you’re interested in designing, TKGA offers a Professional Knitwear Designer Certification course. For more information, use this link.
Bibliography
Brunette, Cheryl. Sweater 101. Marrowstone Island Press, 2007.
Doherty, Elizabeth. Top Down: Reimagining Set-In Sleeve Design. Quince & Company, 2015.
Paden, Shirley. Knitwear Design Workshop. Interweave Press, 2009.
Pattern Associated with Article — Pocomoke
Copyright 2023, The Knitting Guild Association, Cast On Winter 2022-2023, All Rights Reserved
