Learn Something New!
Phrancko’s Seamless Set-in Sleeves
By Frank H. Jernigan (Phrancko)
Set-in sleeves are the best-fitting type of sleeve that can be knitted. It avoids all the extra fabric under the arm that comes at worst with the drop shoulder sleeve but is also an issue with every other type. Typically, set-in sleeve designs are created by working the full body and leaving an opening where the sleeve will be attached. The sleeve may be worked separately and then seamed to the body, or it may be started by picking up stitches around the armhole and working down to the cuff, using short rows to create the shaping of the sleeve cap. Either of these methods requires the top of the body from the underarm to the top of the shoulder to be worked flat. (That is, of course, unless one uses steeks, which is a completely different solution.) Working the top of the sweater flat limits the design of the sweater to patterns in that area that are easy to work alternating between right side and wrong side. Some patterns—like Alpine cables, stranded colorwork, and some lace patterns—can be very difficult to work on the wrong side. My Phrancko’s Seamless Set-in Sleeves technique permits the body to be worked entirely in the round except for the very top where the neck divides the work.
There are precise calculations that take all the guesswork out of designing with this technique. The calculations may seem a bit tedious, but a link to a spreadsheet will be provided that can be downloaded and used to perform all the calculations once the desired measurements for the sweater are set.
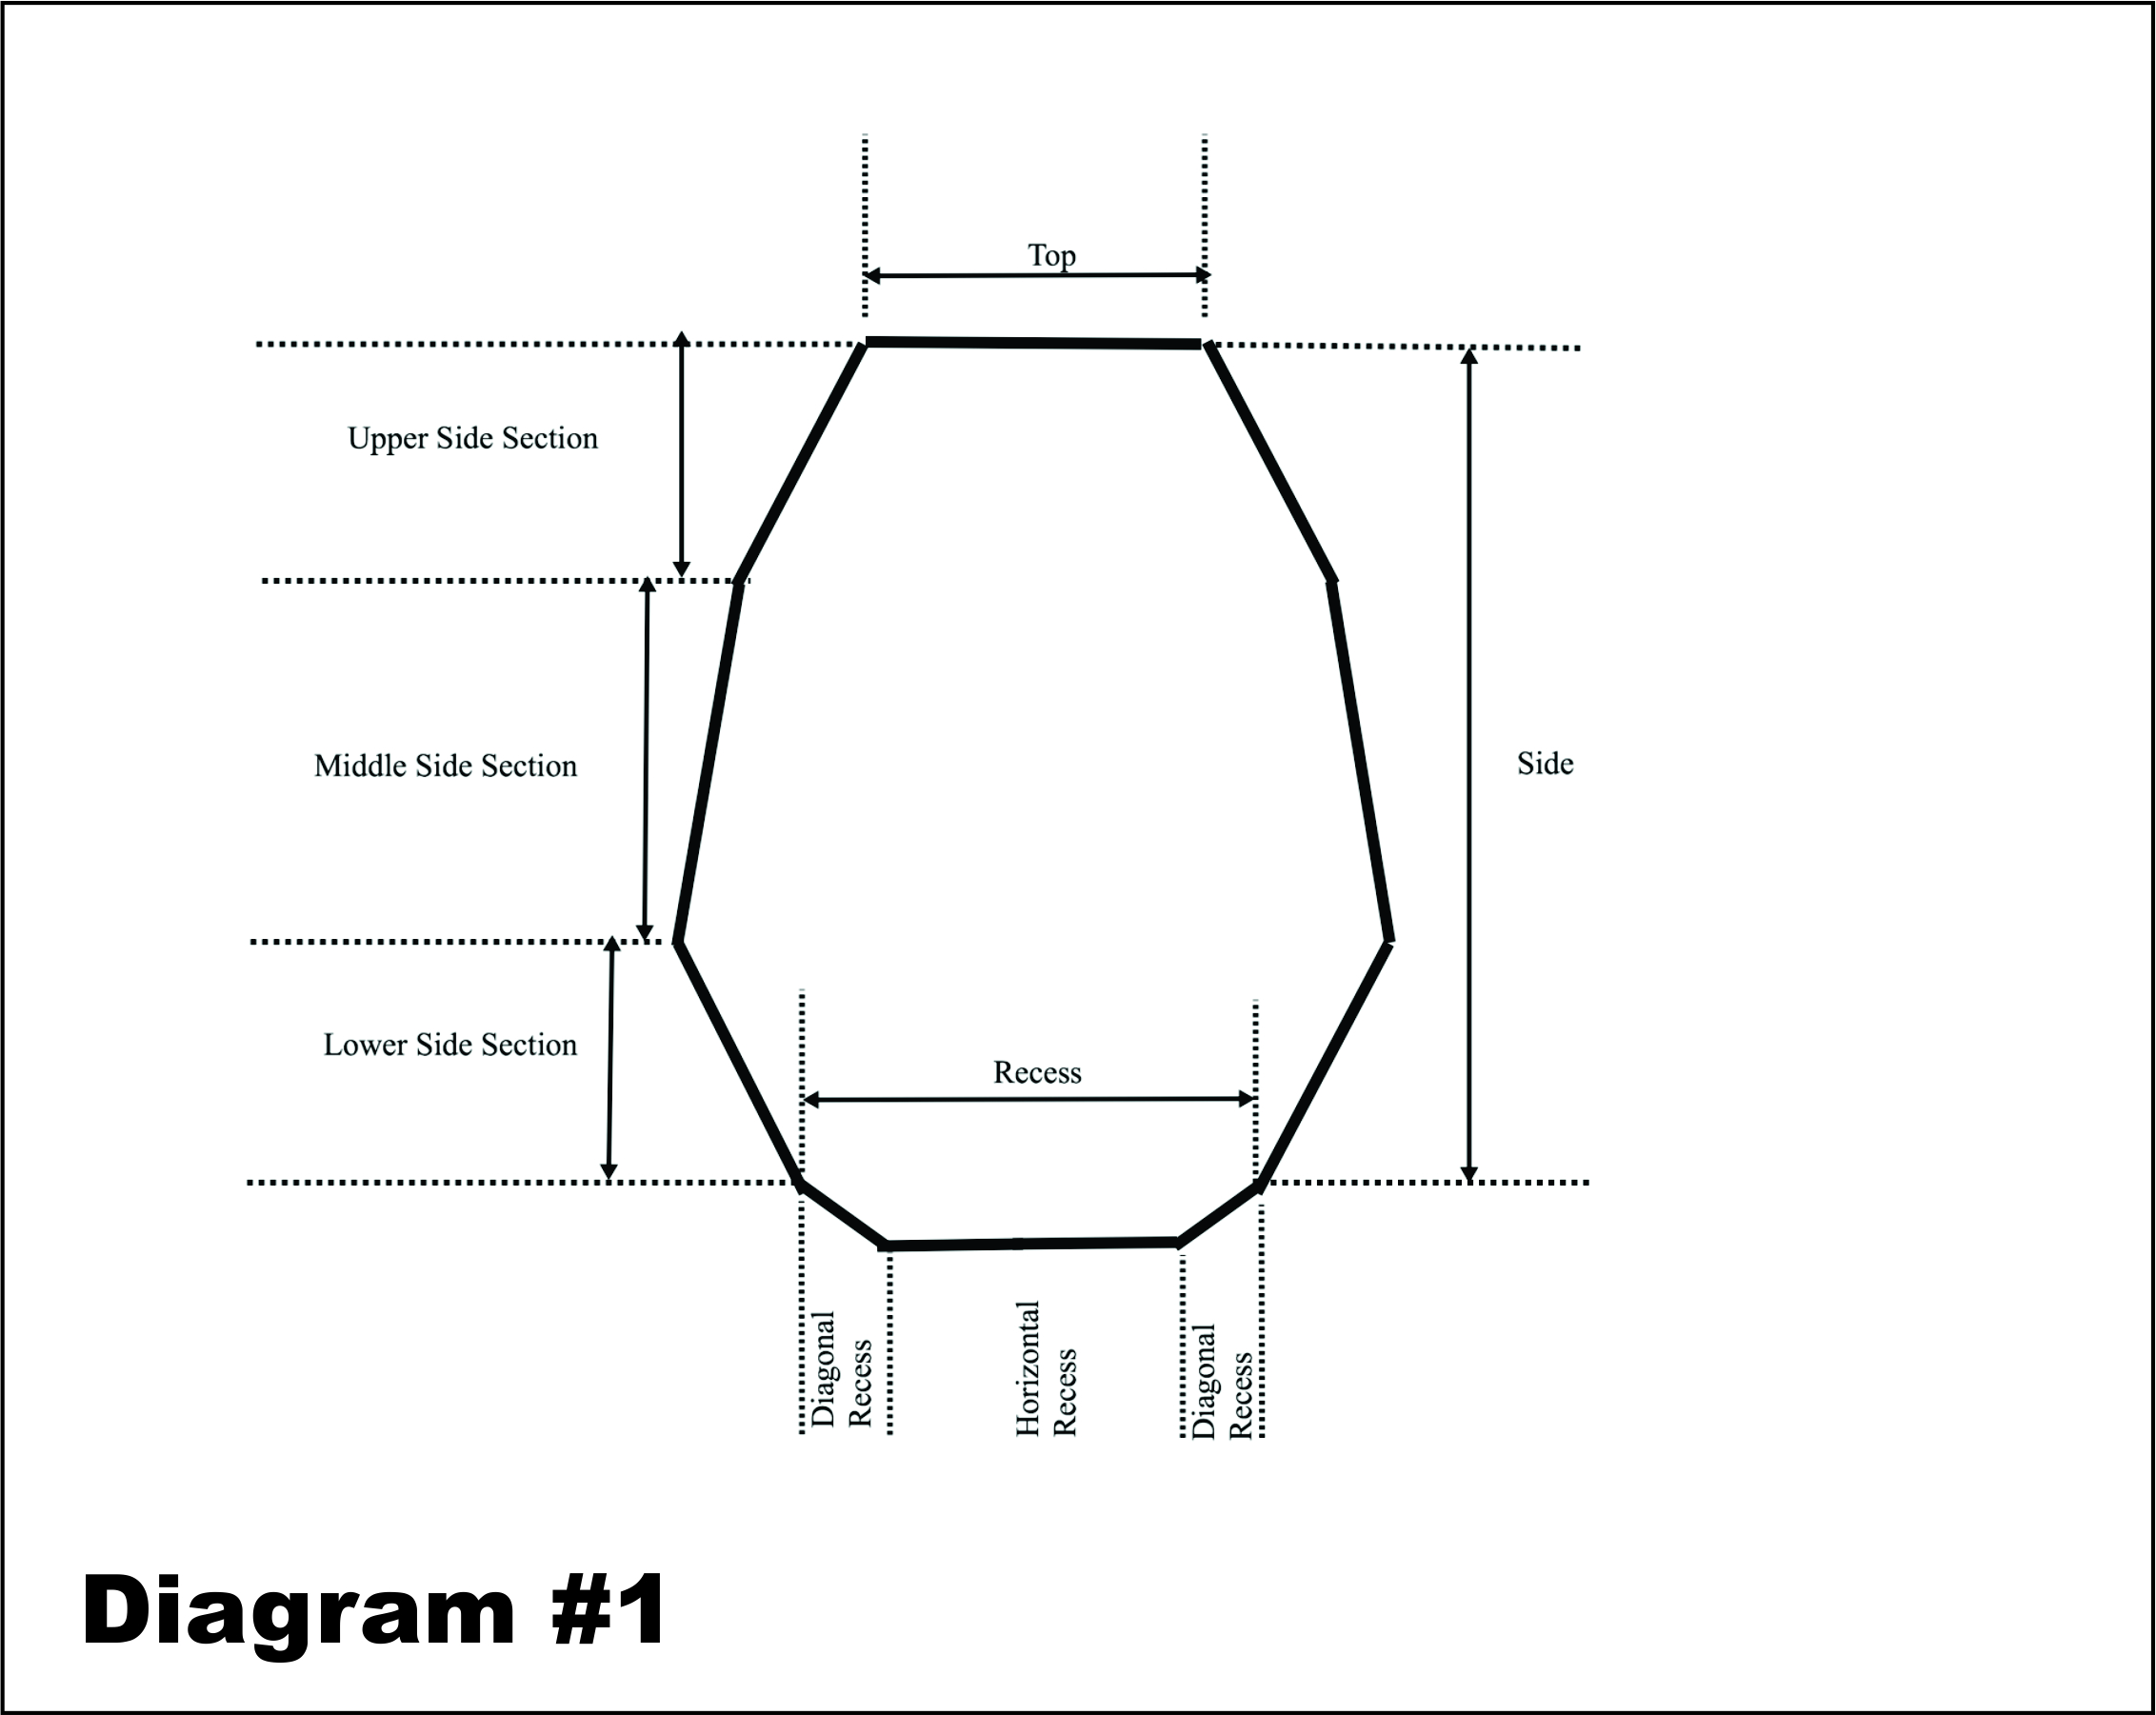
Let’s begin by examining and naming the various parts of the sleeve cap for a set-in sleeve. The circumference of the sleeve cap may be divided into four primary sections: the top, two sides, and the recess at the bottom. Each of the sides is further divided into the upper side section, the middle side section, and the lower side section. The recess is also divided into the horizontal recess and two diagonal recess areas on either side of it.
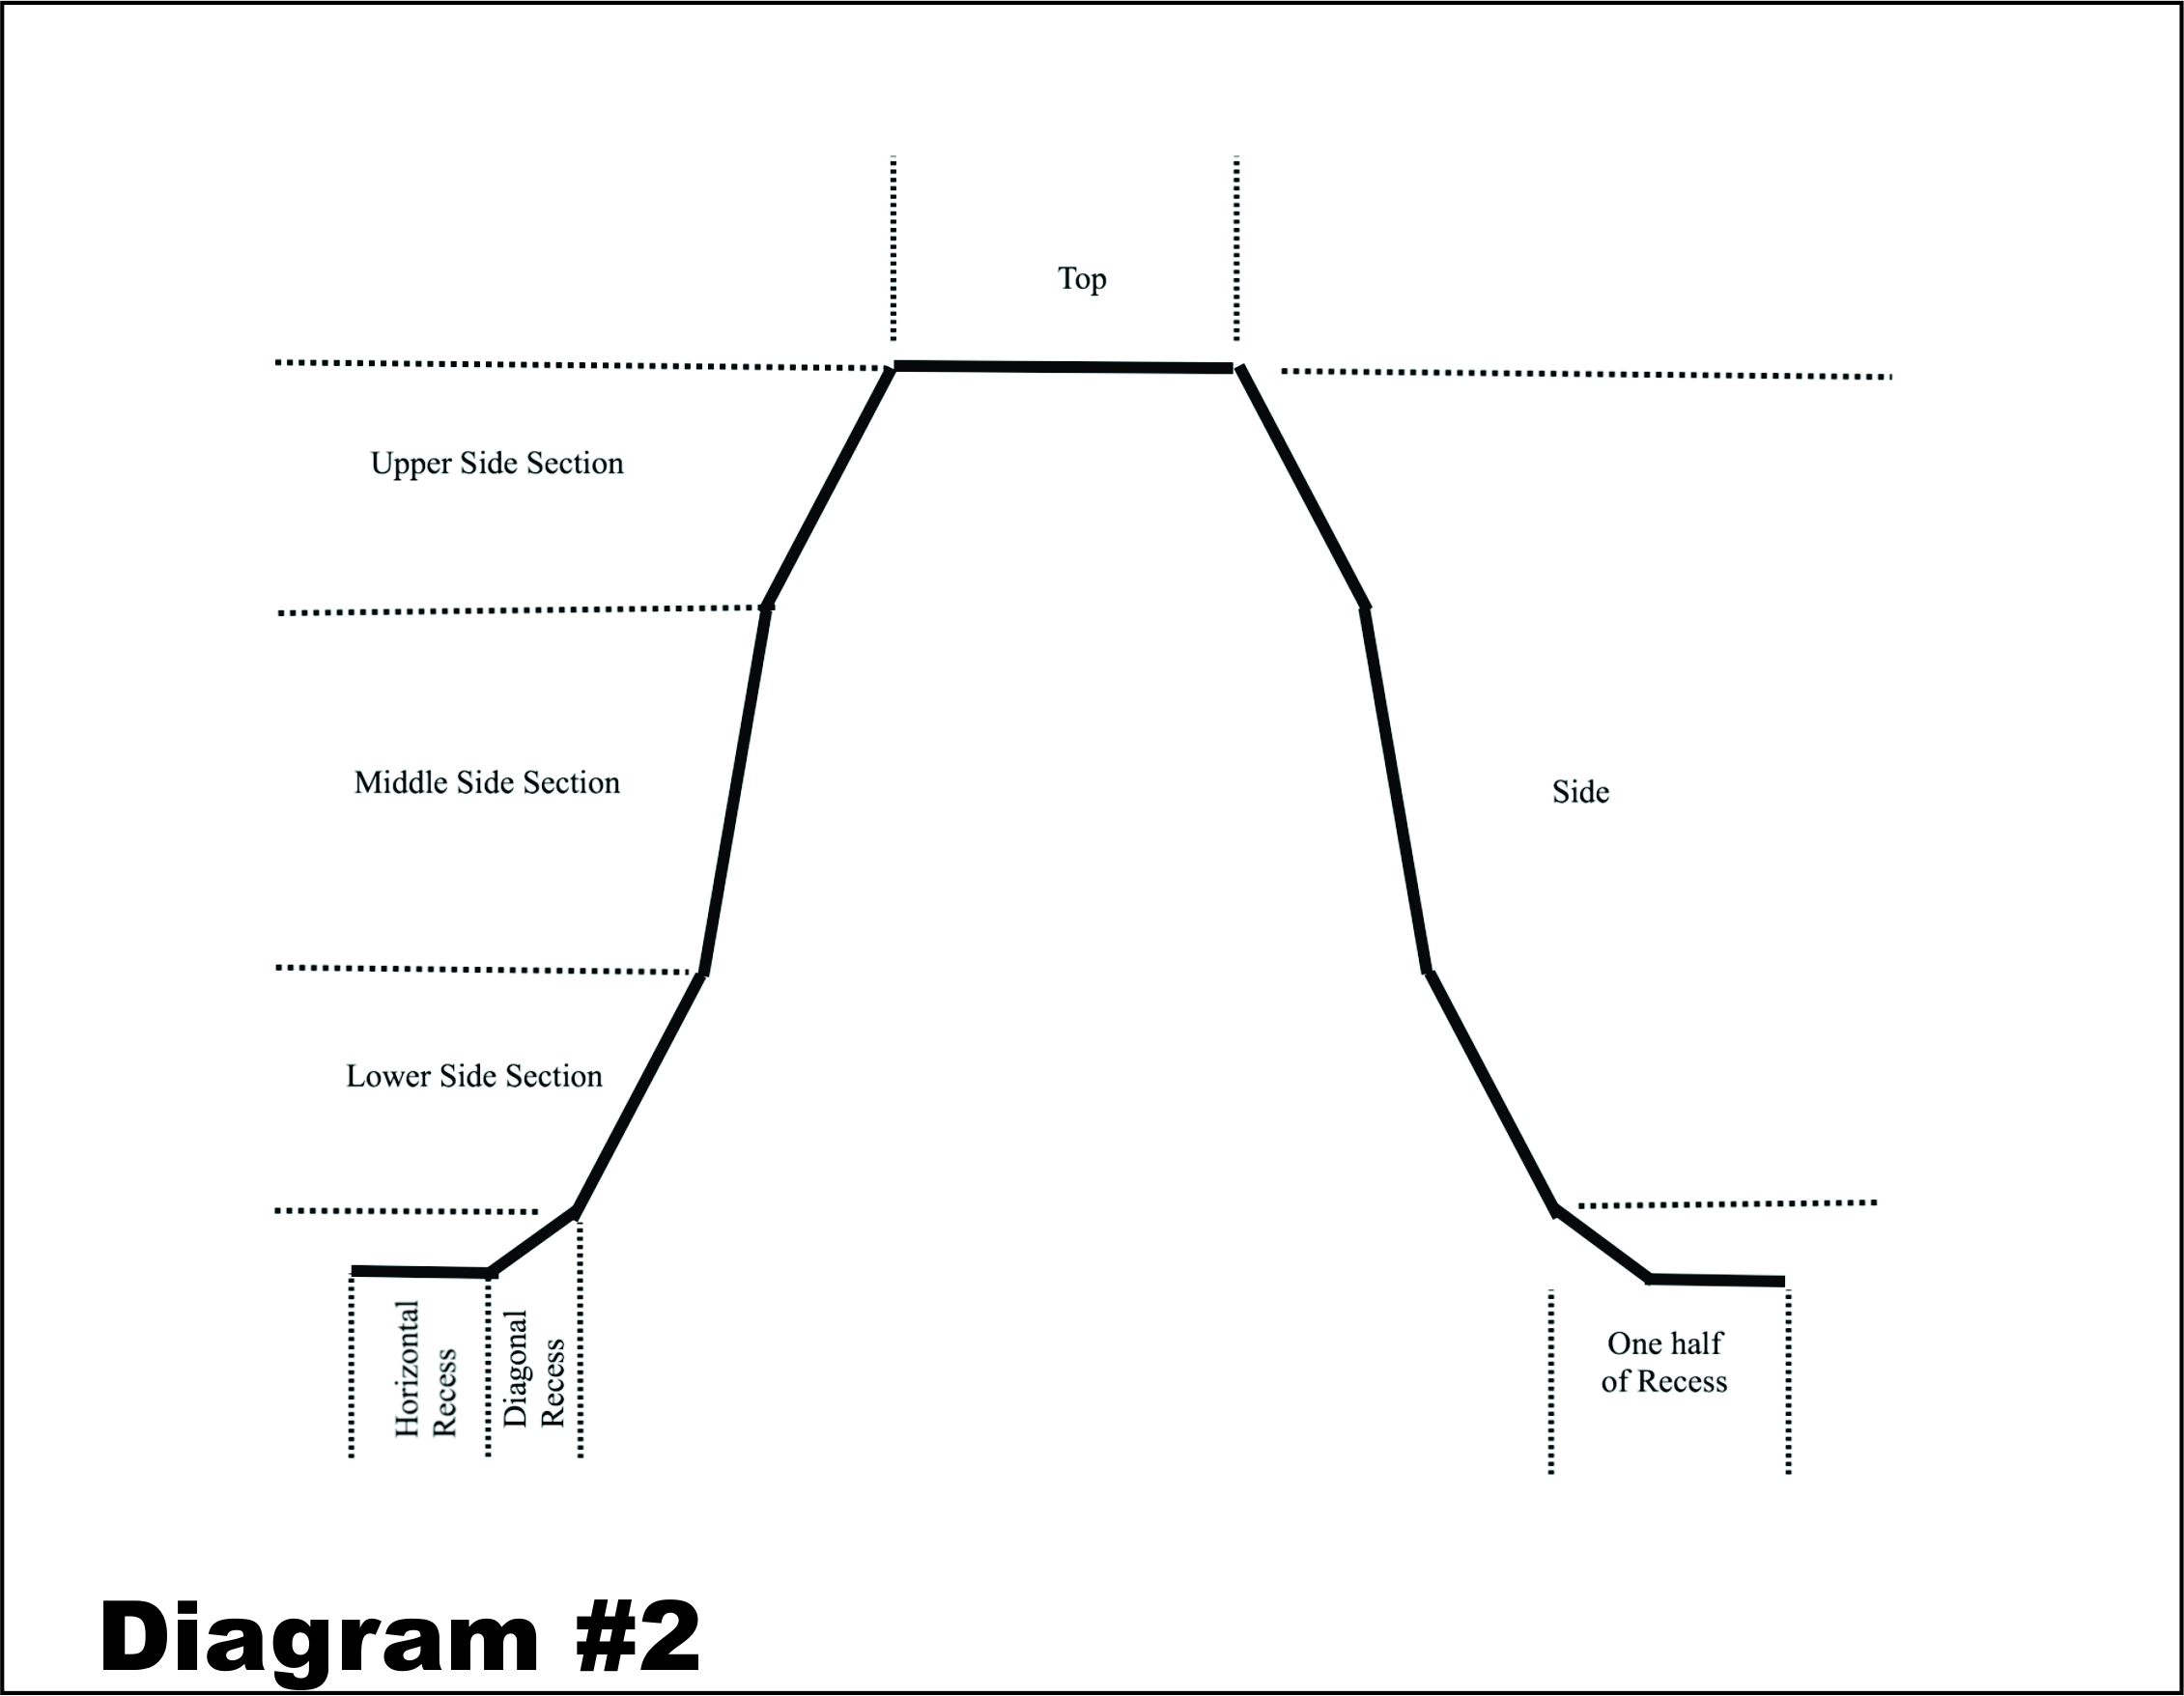
All of these sections are shown in Diagram #1. Note that the more common way to view the sleeve cap is with it spread apart for flat knitting as in Diagram #2, but for this discussion that does not apply. Diagram #1 simply closes the two ends into a circular unit since that is actually how it appears in the garment and how you will knit it when working in the round.


Each section has its own manner of adding stitches to the circumference of the sleeve. The total number of stitches that will be added from all the sections is the number of stitches in the circumference of the sleeve itself at the underarm. Starting with no sleeve stitches, the first stitches are picked up across the top from the selvedge edges of the shoulder piece. The stitches down the sides are added by appropriately spaced increases. The stitches in the diagonal recess are added on every row while also adding stitches to the body via double increases. And finally, the stitches in the horizontal recess are added by casting on stitches at the underarm.
Calculating the Number of Stitches to Cast On for Each Shoulder
Once the desired measurements are known for the width of the neck, the width of each shoulder, and the width of the recesses, we are then able to calculate the number of stitches to cast on for each shoulder. Simply multiply the desired width of the shoulder by the stitch gauge and round to a whole number.
The child’s Ziggy-Zaggy Sweater in this issue illustrates the calculations we will be discussing. The gauge for that sweater is 5 stitches per inch and the width of the shoulder for Size 6 is 3 inches:
3 inches x 5 sts per inch = 15 sts to cast on for each shoulder
Distribution of Stitches Among the Sleeve Cap Sections
The circumference of the sleeve at the underarm in our sample sweater is 10 inches, which at a gauge of 5 sts per inch similarly calculates to 50 stitches. As said earlier, every one of those stitches originates from the various sections of the sleeve cap. The number of stitches in the recess is calculated by doubling the recess measurement and calculating the number of stitches that represents for your gauge. In our sample, the recess is set to be 1.25 inches. Calculate the number of stitches that the recess contributes to the sleeve circumference as follows:
(1.25 inches x 2) x 5 sts per inch = 13 (rounded) sts total in the recess section
Each of the other three primary sections, namely the two sides and the top, will contribute approximately one-third of the remaining stitches needed for the circumference of the sleeve. To calculate that, we divide the remaining stitch count by 3:
(50 sts – 13 sts)/3 = 12.333
In our example, that would mean 12.333 stitches in the top and in each of the two sides, with 13 sts in the recess. But you can’t divide stitches and there are also other constraints, like needing to have the same number in each side section. And we need to decide how to divide the 13 recess stitches between the horizontal recess and the two diagonal recesses. The numbers are adjusted to meet all these constraints while also subdividing the numbers into the individual subsections.
Beginning with the recess section, we divide the 13 recess stitches into the horizontal recess and the two diagonal recess subsections. Approximately half of the stitches go into the horizontal recess and one quarter of them go into each diagonal recess. We calculate the number of stitches in the diagonal recesses by dividing the total number of stitches in the recess by 4 and rounding the result:
13 sts/4 = 3 (rounded) sts in each diagonal recess
So the diagonal recess sections produce 3 sleeve stitches each, or 6 total, to the sleeve circumference. Subtract the total of the two diagonal sections from the total number of recess stitches to get the number of stitches to be cast on at the underarm.
3 sts x 2 = 6 stitches in diagonal recesses
13 sts – 6 sts = 7 stitches to cast on (or cast on one less if you are going to use a provisional cast on and pick up an extra stitch later)
Now that we have the number of stitches worked out for the recess, we subtract the total number of recess stitches from the total circumference stitches and divide the remainder between the sides and the top.
50 sts in circumference – 13 sts from recess = 37 stitches remaining to produce along the sides and top of the sleeve caps
We now divide that number by 3 and round it off to determine the number of stitches to create along each side.
37/3 = 12 (rounded) stitches created along each side
With that number along each side we can now calculate the number of stitches that will be picked up along the top.
37 – (2 x 12) = 13 stitches to be picked up along the top of the sleeve cap
Finding the Number of Rows to Work at the Top of the Shoulder
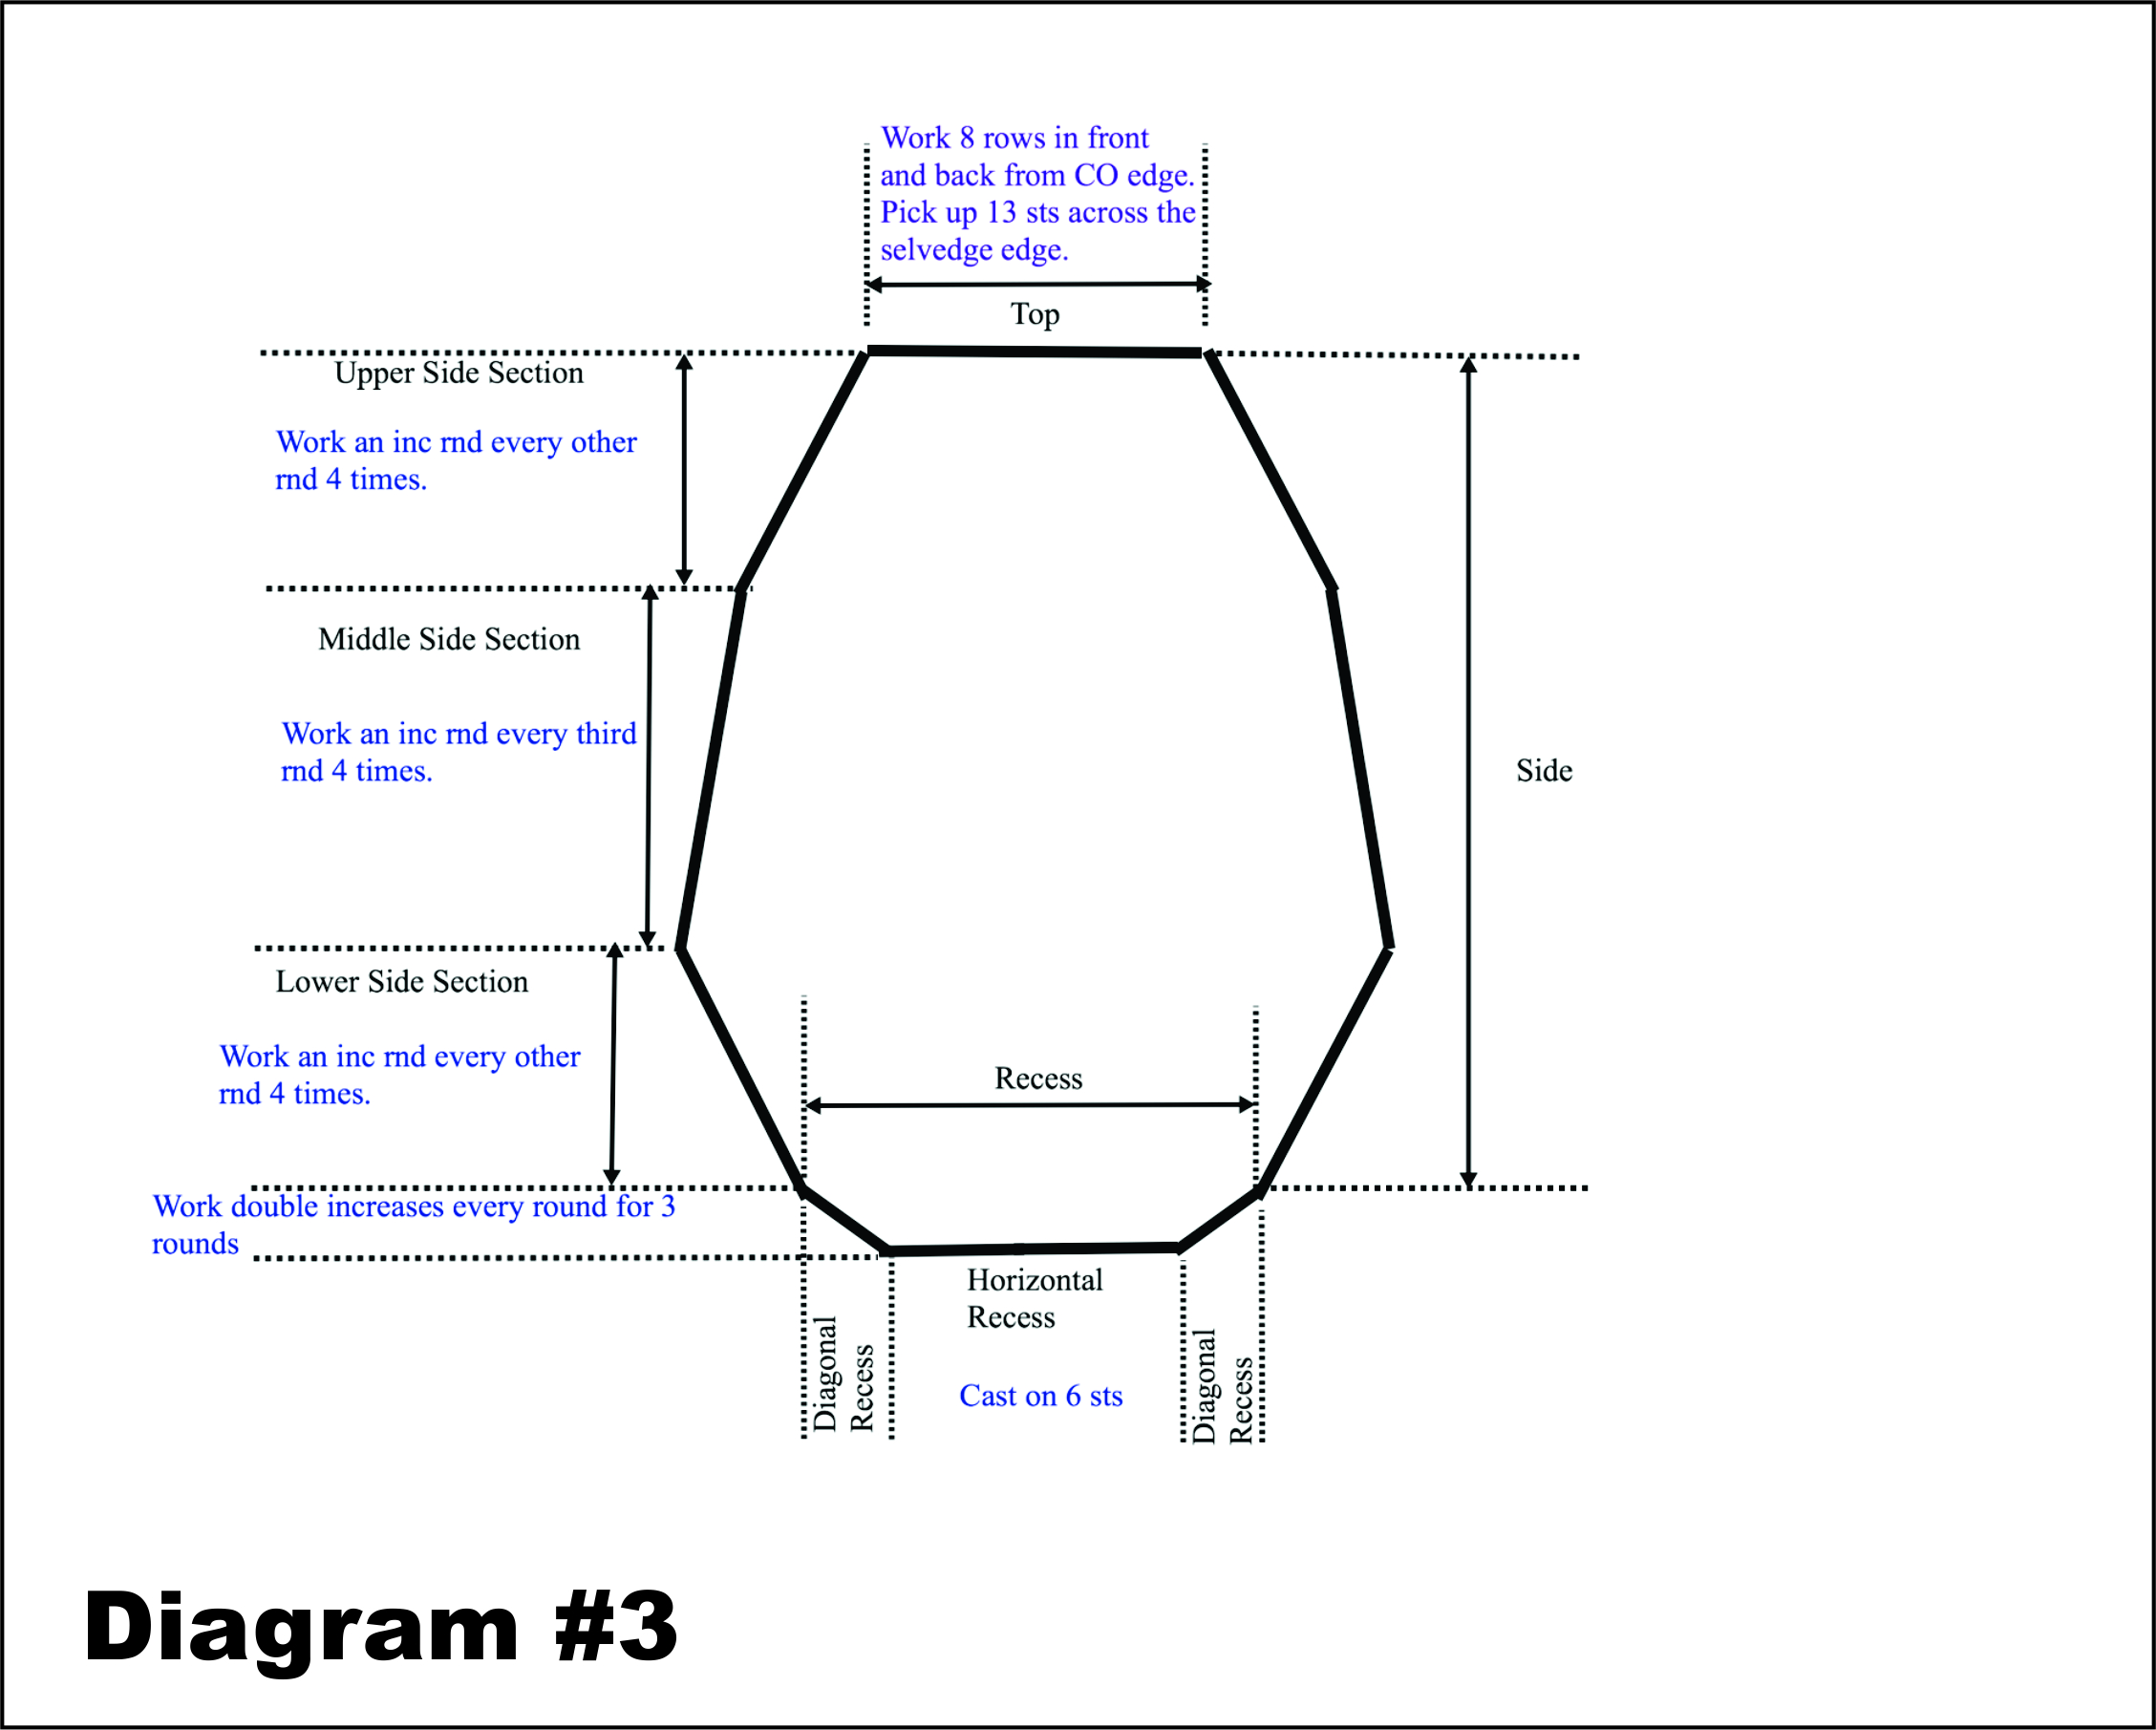
If there are 13 stitches across the top, how many rows of selvedge are required to pick up that many stitches? The width of 13 stitches is 2.6 inches (13 sts/5 sts per inch = 2.6). The number of rows to equal that is 16.9 (2.6 inches x 6.5 rows per inch = 16.9). The closest even number to that is 16. So 8 rows need to be worked on the front and 8 rows worked on the back from the cast-on stitches to cover the top of the 13-stitch wide sleeve cap.
Creating the Required Number of Rounds in the Sleeve Cap to Fill the Opening
Sleeve stitches are created down the sides of the sleeve cap by working the desired number of increases. The question is, how many rounds in the sleeve opening are needed to distribute those side increases? For our sample sweater, the desired opening is 6 inches. If there is an increase round every other round, there would be 24 rounds (12 inc rnds x 2 rnds per increase rnd = 24). Since rounds worked from the cast-on edge are also part of the height of the sleeve opening, add 8 rounds to those 24 to get 32 rounds. And because the diagonal recess also adds a round for each stitch of recess, add 3 more rounds, resulting in a final count of 35 rounds in the sleeve opening. That is how deep the sleeve opening would be if we just did increases every other round down the side. But 35 rounds is only 5.38 inches (35/6.5 rows per inch = 5.38), and the opening needs to be 6 inches. We need .62 more inches of height (6 – 5.38 = 0.62), which translates to 4 rounds (0.62 inches x 6.5 rows per inch = 4.03, rounded to 4).
Those 4 rounds are inserted into the middle side section of the sleeve cap by increasing every third round instead of every other round in that section. For this sample sweater, the middle side section will consist of four repeats of increasing every third round. The total number of increase rounds for the sides is 12. Four of those will be done in the middle section, which is the section worked with increases every third round. That means 8 increase rounds need to be worked in the upper and lower side sections, which are both worked with increases every other round. Splitting the 8 sts between the upper and the lower, each section gets 4 increase repeats. If it had been an odd number, we would simply add one more at either the top or the bottom. Diagram #3 shows the results of all these calculations.

A Spreadsheet Helps
For further help, a spreadsheet is provided that includes all the calculations described above. The spreadsheet is pre-filled with four children’s sizes and five men’s sizes, so you do not need to download the spreadsheet. However, to customize the calculations for your specific size, you should download the spreadsheet and work with your own copy.
Use this link to download the spreadsheet to your own computer. Right click to save it to your computer. Select the option for saving the link. (Different browsers display different menus.) Then use the spreadsheet software of your choice to input the values for your project. If you do not have a spreadsheet program, free spreadsheet software is available by using Google Sheets or Apache Open-Office Software.
Once you are running your own version of the spreadsheet, enter the values for your project in the blue fields. Start by entering the stitch and row counts and measurements in column C to calculate the stitch and the row gauges for the swatch you created with the yarn and needles you are using.
Next, enter a label for the size you are creating. Then enter the values for the desired chest circumference, the neck width, the shoulder width, the amount of recess for the set-in sleeve, the desired height of the sleeve opening, and the circumference of the sleeve at the underarm. All of these values are in inches and come from actual measurements that you want your garment to be. You may enter any measurements for any size. After the first four values are entered, the spreadsheet will check to see that they produce the desired chest circumference. If that circumference is not within one quarter inch of your desired chest circumference, then the word “FALSE” will appear in the cell. Adjust the numbers for neck width, shoulder width, and recess until you get close to the chest circumference you would like.
All of the numbers needed to work the sleeves in the round will now appear in the spreadsheet, highlighted in yellow. For example, the sample spreadsheet indicates for Size 2 at H14 you would cast on 12 stitches for each shoulder. You would then work 7 rows on the front and 7 rows on the back as indicated in cell H28. When you first pick up stitches across the top of the sleeve cap, H22 tells you to pick up 10 stitches. You then work short rows across the tops of the sleeve caps the first time around, starting and ending the short rows 3 sts from the ends of the sleeve caps. After that you work increases in the sleeve caps every other round 5 times (cell H36), work increases every third round 1 time (cell H34), and then work increases every other round 4 times (cell H37). Finally you would work double increases at the edge of each sleeve cap 3 times (cell H18) for the diagonal recesses and cast on 3 stitches (cell H19) for the horizontal recess, using a provisional cast on to continue working the body. Those 3 stitches become 4 stitches when you pick them up to work the sleeve. The end result is that you will have 40 stitches (cell H16) around the sleeve when you first start working the sleeve.
Conclusion
Whether you use the spreadsheet or work the calculations yourself, my Phrancko’s Seamless Set-in Sleeves technique can be applied to any type of project, even those that are difficult to work flat as long as that part of the design begins after the close of the neck, or when you begin working in the round. The Triple Mock Cable Sweater, with an Austrian-Bavarian design in that part of the chest, is another project using this technique and appears elsewhere in this issue of Cast On.
I wish to acknowledge that the original suggestion for working set-in sleeves in the round came from Barbara Walker’s book, Knitting from the Top, in which she describes her “Simultaneous Set-in Sleeve.” And special thanks also to JC Briar who taught me how to start a set-in sleeve design from the top and also suggested possible ways to improve on Walker’s approach.
Pattern Associated with this Article — Ziggy-zaggy Sweater
Copyright 2018, The Knitting Guild Association, Cast On Fall 2018, All Rights Reserved
