No products in the cart.
Designing Arans—Part 2 by Donna Estin
Special Topics in Design Fall 2023
This is Part 2 of a 2-part article that focuses on the execution of designing Arans. Part 1, published in the Summer 2023 issue of Cast On, covered important design decisions and considerations that must be addressed before continuing. This article does not re-cap Part 1 but rather continues from where it left off. See the accompanying pattern, Tobar Aran, in this issue.
Laying Out the Design
Since we’re not working with an overall stitch gauge, we must piece together our columns of cables. They need to fit across the designated widths of the garment, but they also must complement one another.
Arranging the Cables
Once you have knit a separate swatch for each cable pattern and filler stitch, blocked the swatches and let them dry, then shake them out and place them in different arrangements on your desk or table. How do they look next to each other? Do the edges of one cable provide variety compared to the cable panels next to it? What about the width of each panel? Move these around, paying attention to outline, density, characteristics, and firmness of each cable, until you land on a look which works. Can you start to see which cable panels can be enlarged to maintain proportions for the larger sizes?
Horizontal Balance
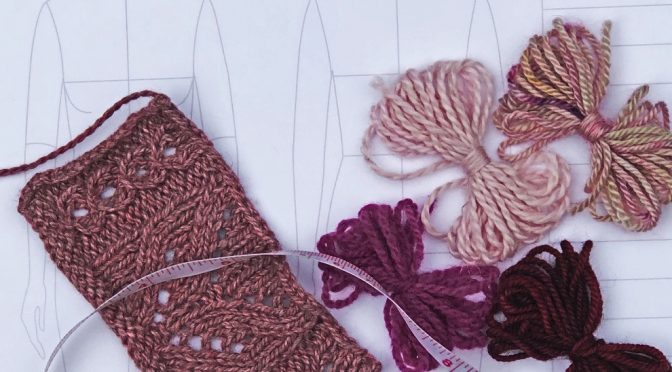
Excluding the extra stitches that you worked at each edge of the swatches, write down the width and number of stitches used for each panel. These may change as you lay out your design. In Figure 1 below, I started with 8 stitches for Chart B, the Gull Stitch. This measured 1.25”. As I laid out the design, the entire layout of cables was too wide to fit within the cross-back of the smallest size. By changing Chart B from 8 to 6 stitches, it narrowed this cable from 1.25 to 1” for a better fit.

Can you place “purl cables” next to “knit cables”? Some cables begin with purl stitches. These are braids and ropes that are on a background of reverse stockinette. Some cables begin with knit stitches. Honeycomb is an example of this. Honeycomb can be as wide as you like and is a good choice to use when grading a large range of sizes. By alternating between cables that begin with knit and purl stitches, the knitter doesn’t need to use stitch markers between each chart. Just one more thing for you to think about in case you are finding this whole process too easy so far.
Vertical Balance
Just as you measured the width of each panel, focus on the center panel only and measure the length of one repeat. We focus only on the center panel because this is the panel that will be bound off completely just under the neckline. The remaining panels will be continued through to the shoulder and normally do not form one complete image. Your goal is to have complete repeats run from bottom to top, so the top of the center panel falls just under the neckline.
First, calculate the amount of vertical space available to lay out cables. This is your cable placement area. Measure from the bottom edge of the garment to the top. If you’re designing a set-in sleeve garment, you’ll measure from the bottom edge to the beginning of the armhole shaping, add in the armhole length, plus any shoulder shaping. These three measurements equal the overall length.
Next, subtract the front neck drop. This is taken from the top of the shoulder shaping to the knitted front neck edge, before any ribbing or trim is added around the neck. If there is no shoulder shaping, then the drop is calculated from the top of the armhole.
Next, subtract the bottom border if you are using a different stitch pattern. Now you have your cable placement area. In Figure 2 below, you’ll see that we end up with 21” to place our cables. If each center diamond panel is 3” high, we can neatly fit 7 repeats of the chart into the 21” and all diamonds will look the same, with the bottom and top diamond being fully worked. The center panel is now vertically balanced.
three measurements equal the overall length.
Next, subtract the front neck drop. This is taken from the top of the shoulder shaping to the knitted front neck edge, before any ribbing or trim is added around the neck. If there is no shoulder shaping, then the drop is calculated from the top of the armhole.
Next, subtract the bottom border if you are using a different stitch pattern. Now you have your cable placement area. In Figure 2 below, you’ll see that we end up with 21” to place our cables. If each center diamond panel is 3” high, we can neatly fit 7 repeats of the chart into the 21” and all diamonds will look the same, with the bottom and top diamond being fully worked. The center panel is now vertically balanced.

Before writing the pattern or knitting, make sure you can balance this. If you are designing only one size and the center panel is not balanced, it’s easy to change the length of the garment, the length of the front neck drop, the length of the bottom border, or add/subtract rows in your center panel to make the motif larger or smaller.
It’s not always this easy, especially when grading sizes.
If working a drop-shoulder garment, it’s easier to work complete repeats since you do not need to designate an armhole. You just knit until you’ve reached the end of the chart, then bind off for the neck. The drop-shoulder sleeves are added later. Instead of writing your pattern to read “continue working in pattern until piece measures 17”…, write, as an example, “continue working in pattern until Chart E (name of center panel) has been worked seven times.”
If you’re shaping armholes, once you bind off for the armhole, you have a specific area to work before shaping the neck. Any adjustments in length should be done before binding off for armholes. Don’t try to fit an even number of repeats before binding off for the armholes. Think of your entire cable placement area as a whole.
When grading a wide range of sizes, fitting complete repeats vertically isn’t always going to work. But there are workarounds.
One visually pleasing option is to break a diamond at the center. If you begin your diamond in the middle, you can either end in the middle which gives you complete repeats, or end at the point of the diamond, which visually looks like it should since it is a complete diamond.
Other workarounds include:
- Adjust the starting row for certain sizes at the bottom of the sweater to allow you to end with a finished motif at the neck.
- Work top-down so that the center motif is placed exactly under the neckline, then work in pattern as long as you want to reach your complete repeats.
- Shape front neck over fewer rows to allow more flexibility for knitters to “work even” until they reach the armhole length.
- Lengthen or shorten center panel by adding or subtracting rows from the chart.
- Change center panel design entirely.
- Alter the armhole or front neck drop measurements, but be careful here. You don’t want to compromise fit.
- Use saddles which add to the front neck drop. This allows your cable patterning to continue further without as much front neck shaping. The distance between the beginning of the armhole and the front neck bind off is closer in measurement to the armhole length.
Chart Compatibility
For the rest of the cable charts, if they have compatible row repeats, it’s easier for knitters to follow, and the cables will interact with their neighboring cables, like outward bends at the same place throughout the garment.
For example, the center panel is 24 rows. The panels on either side of the center, are 6 rows. The panels outside of these are 12 rows. For every one center panel, the panels next to it are worked four complete times, and the panels outside of these are worked twice.
Gauge
With any other design, you rely on stitch gauge to determine the number of stitches you need over a certain width. With Arans, instead of thinking in terms of stitch gauge, think about the widths of each column. View your design in long strips, each having a different width. The only stitch gauge that you will use will be that of the filler stitch or any stitch pattern that varies the width. For example, Honeycomb Stitch can be worked over 4 stitches. You can have a skinny single column of honeycomb that is only 4 stitches or sections as wide as you like, as long as they’re multiples of 4 stitches. If you have a stitch pattern in which each size uses a different number of stitches, you can treat this as your filler stitch and use a stitch gauge to determine how many stitches are needed in this section. Otherwise, put stitch gauge aside and focus on making the columns of patterns fit based on their widths.
Making This Fit
With a piece of graph paper, designate one box as one inch. Write out each size and start laying out your pattern with the smallest size, working up to the largest.
Figure 3, below, is a sample of a set-in sleeve garment. I have chosen this example since it is more challenging and has more considerations than a drop-shoulder garment. Draw out your chart however you like. This is just one example of the information that you’ll need. The size labels and width of the front/back are listed along the left column. C/B indicates the cross-back area. Each horizontal line under the letters is measured to the correct cross-back area for each size. The outer vertical lines represent the end of the fabric at the full back width. For size Small, the cross-back is 14.75”, the full back is 20” which leaves a difference of 5.25” divided evenly between left and right sides of the cross-back which is 2.625”, rounded to 2.5”.

The first task is to fit your cable layout into the cross-back section for each size. This is where using larger and smaller versions of the same cable chart help maintain size proportions. If your cable chart can’t be easily enlarged, you can add more separator stitches between each chart for the larger sizes. This helps keep the overall pattern pleasing instead of bunched up. If you are using 2 purl stitches between each cable on the S size, you may wish to use 3 or 4 purl stitches between each on the larger sizes.
Once you have a layout that you’re happy with, move to the number of extra stitches you need in order to reach the cross-back width. These are listed as p2, p3, p4, etc., above. The biggest difference in sizes will come between the cross back and the full back. Take the full back width minus the cross-back, divide in half, and this is the measurement along the left side that reads “ea side.” The S needs only 2.5” on each side but the 4X needs 7” on each side. If you plug in one filler stitch, such as Moss Stitch, that’s 14” of Moss Stitch at the sides of the body once the front is seamed to the back. That is a wide section that should be broken up for a more eye-catching design. So let’s look a little closer at grading Arans for larger sizes.
Grading Arans Across a Wide Range of Sizes
You want to keep the same look across all sizes, so don’t move cables around that change the overall look. A 4X sweater should be recognized as a larger version of an S sweater, not a different sweater. This means using the same cable patterns in the same order. You may have wider cables or a couple more columns of cables for the larger sizes, which is fine. Offer smaller and larger charts of the same cable. This is most important for the center panel, but is not needed for every chart.
Certain patterns—like Moss Stitch that is worked over 2 sts, or a single honeycomb pattern that is worked over 4 stitches, or double honeycomb worked over 8 stitches—can easily be enlarged. For example, work Single Honeycomb pattern over 4 (8, 8, 12) [16, 20, 24] sts.
Use more purl stitches in between charts to add width.
Break up the monotony in the sizes by using different stitch patterns that are easily shaped. For example, in the above photo, where the 4X needs 7” on each side of the cross back, instead of working in one pattern, like reverse stockinette for 7”, try using 3” of Moss, 3” of reverse stockinette, and one inch in between with columns of slip stitches to create a divide. A single column of knit stitches slipped every right-side row on a background of reverse stockinette makes a striking dividing line and takes little space. Think of this as a skinny column in itself.
Sleeves
The pattern arrangement on the sleeve does not need to be the same as the front or back, but should pull from the same selection of cables. The center body cable is normally too wide for a sleeve. A good option is to choose the next smaller cable for the center of the sleeve, with smaller cable panels arranged symmetrically from the center out, followed by the filler stitch where the shaping of the sleeve will occur.
If you’re using saddles, keep in mind that the center cable will run to the neck edge. A 2.5” center cable will not work with a skinny 1” saddle. Either make your saddle 2.5” or select a narrower center cable. These two must mesh together.
Writing the Pattern
Now that you’ve laid out your cables in a pleasing manner, with correct widths and stitch counts, including selvedges, it’s time to start writing out the pattern. Refer to the publisher’s style guide or pattern template and follow their preferences exactly. This isn’t the time to show that you know a better way. Just write the pattern exactly like they want. If you’re self-publishing, refer to your own style sheet so it’s consistent with your other patterns. Use abbreviations whenever possible and be consistent. If you’re using both imperial and metric measurements, those must be carried throughout the entire pattern, including the schematic. Most complaints are when patterns are too wordy. Write what you want to say, then condense it. Remove extra words and redundancies. Match your pattern wording to the intended skill level of the knitter. Since Arans rely heavily on charts, the success of your pattern depends largely on how good your charts are.
Charts
Charts are a must for Aran sweaters, but not all knitters use them. This is why the majority of publications require that charts be written out as well. If you are self-publishing, use this feature in your charting software to create written versions of each chart.
Use one key for all charts. Name your charts the same way you refer to them in your pattern. If your Moss Stitch chart is listed as Chart A, then in your pattern instruct knitters to work Chart A, not to work in Moss Stitch.
Do not chart out entire sections like the back of a sweater. Boil each chart down to the minimum number of stitches and rows needed. Use repeat lines when possible. If there is a section where charts always appear in the same sequence, like Chart A, Chart B, Chart A, then one option is to create one chart for this arrangement as long as it’s not too wide. If at any point you will use just Chart A, then create a Chart A and a Chart B. There is no need to display the whole A, B, A sequence. See Figure 4.

If a chart has cable crosses on every right-side row, then either include one wrong-side setup row at the beginning in your instructions before starting the chart, or create two setup rows outside of the repeat section so there are some stitches worked before forming a cable. Otherwise, the band underneath the cable or the bottom edge—if no border is used—will be distorted. See Figure 5.

If you don’t have cable crosses on every right-side row, and you have some plain knitting rows, place these at the beg or end of the chart with the cable crossings in the middle instead of the cable crossing at the bottom (Figure 6). This arrangement will make diamonds and circles look like Xs since you’re charting the top half of the diamond, then the bottom half. The reason for this is that you do not need setup rows since the first two rows do not involve cables. You can just start knitting with Row 1 of the chart.

Make sure your cables are vertically balanced within the chart. There should be about the same number of plain knitting rows above and below the cable. See Figure 7.

Create chart schematics (Figure 8) as a quick reference and place in the header of each page to remind knitters of the sequence for working the charts.

Can you even up the charts? We talked about chart compatibility earlier. If one chart is 16 rows, and the other is 18 rows, can you make the chart that is 18 rows only 16 rows? Sometimes the appearance is similar enough that you can. This allows the knitter to always work the same row of both charts at the same time. If you have another chart that is 4 rows, then that chart can be worked 4 times exactly within the space of the 16-row chart. This isn’t always possible; and if it isn’t, don’t worry about it. You can use 6 or more different charts with all different row counts, and that’s OK. But when you start thinking in these terms, you’ll often find that chart compatibility is often attainable. This is just something to think about, which makes it easier for knitters to follow along.
If you’ve thought through all of the design elements, cable placements, and sizing dilemmas in advance, the pattern-writing portion and, subsequently, the knitting process will become more straightforward. Rely on your advanced knitting skills to bring creative design elements together into a pattern that knitters can clearly follow. Thinking through obstacles, like how to seam reverse stockinette at the sides and have it look good for an intermediate knitter, contribute to the advance planning stages. Keep your graph layout of cables accurate, both in terms of measurements and stitch counts, so you can refer back to it if needed. It may be months after the design is finished before a tech editor works on the pattern, so you want to have good notes of how you obtained the stitch counts you did.
Designing Arans can be challenging, but it is always rewarding. Arans can be heirloom garments that withstand wear by multiple generations, so take your time and design something you can be proud of for a lifetime.
Bibliography
Brunette, Cheryl. Sweater 101. Marrowstone Island Press, 2007.
Gaughan, Norah. Knitted Cable Sourcebook. Abrams Books, 2016.
Starmore, Alice. Aran Knitting. Dover Publications, Inc., 2010.
Szabo, Janet. Aran Sweater Design. Big Sky Knitting Designs, 2006.
Thompson, Gladys. Patterns for Guernseys, Jerseys and Arans. Dover Publications, Inc., 1971.
Walker, Barbara G. A Treasury of Knitting Patterns. Charles Scribner’s Sons, 1968.
Pattern Associated with Article — Tobar Aran
Copyright 2023, The Knitting Guild Association, Cast On Fall 2023, All Rights Reserved