No products in the cart.
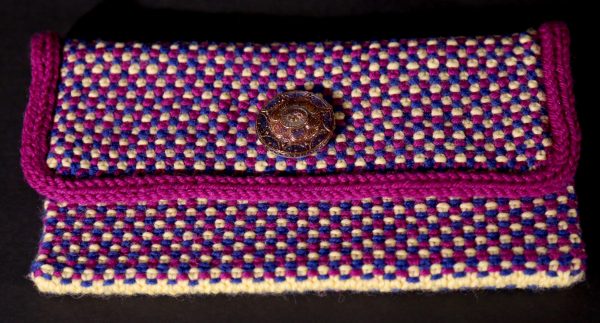
Ashton Avenue Clutch by Carla Cuadros*

 Beyond the Pattern
Because every other stitch is slipped, Linen stitch creates a dense, firm fabric resembling woven tapestry. I enhanced this quality by working with a needle several sizes smaller than usual to produce an envelope clutch perfectly sized to hold just your essentials and perhaps a tiny treasure or two. A large snap keeps the flap closed, while a spectacular button sewn on the outside pretends to do the job.
Size
One size
Finished Measurements
8” wide x 4.5” tall, with flap closed
Materials
Cascade Yarns 220 SUPERWASH (220yds/200m, 100g/3.5oz, 100% Superwash Wool): 1 skein each # 820 Lemon (Color A), #813 Blue Velvet (Color B) and #908 Magenta (Color C)
Size 3 (3.25mm) 40” (100cm) circular needle or 1 size smaller than gauge needle
Size 4 (3.5mm) 40” (100cm) circular needle (for Magic Loop method) or preferred needles for small circumference knitting or size needed to obtain gauge
Tapestry needle
Size 10 sew-on snap
1.25” shank button
TECHNICAL TIP—This clutch may be knit using the Magic Loop method with one long circular needle or using two shorter circular needles for small circumference knitting. If using two needles, it can be helpful if they look different from each other to help keep you from accidentally transferring stitches from one needle to the other.
Gauge
In Linen st, 26 sts & 28 rnds = 4”/10cm, blocked. To save time, take time to check gauge.
Abbreviations
Sl wyib: Slip 1 st pwise with yarn in back.
Sl wyif: Slip 1 st pwise with yarn in front.
Tbl: through the back loop
Stitch Patterns
See Three-Color Linen Stitch charts or row-by-row directions below.
Three-Color Linen Stitch, in the round (multiple of 2 sts + 1)
Rnd 1: With Color B, *k1, sl wyif; rep from * to last st, k1.
Rnd 2: With Color C, *sl wyif, k1; rep from * to last st, sl wyif.
Rnd 3: With Color A, rep Rnd 1.
Rnd 4: With Color B, rep Rnd 2.
Rnd 5: With Color C, rep Rnd 1.
Rnd 6: With Color A, rep Rnd 2.
Rep Rnds 1–6 for pat.
Three-Color Linen Stitch, flat (multiple of 2 sts)
Row 1 (RS): With Color B, *k1, sl wyif; rep from *.
Row 2 (WS): With Color C, *p1, sl wyib; rep from *.
Row 3: With Color A, rep Row 1.
Row 4: With Color B, rep Row 2.
Row 5: With Color C, rep Row 1.
Row 6: With Color A, rep Row 2.
Rep Rows 1–6 for pat.
Special Techniques
Judy’s Magic Cast-On
See video.
2-Stitch I-Cord Bind Off
Using knitted CO method, CO 2 sts; *k1, k2tog tbl (this is the second CO st tog with first st on LH needle), sl 2 sts pwise from RH needle back to LH needle; rep from * to last 2 sts, BO as usual.
3-Stitch I-Cord Bind Off
Using knitted CO method, CO 3 sts; *k2, k2tog tbl (this is the third CO st tog with first st on LH needle), sl 3 sts pwise from RH needle back to LH needle; rep from * to last 3 sts, BO as usual. See this video: (https://www.youtube.com/watch?v=yOWKmRpfwgY).
CONSTRUCTION NOTES—Beginning with Judy’s Magic Cast-On and using either one or two circular needles, the clutch is knit all in one piece from the bottom up in Three-Color Linen Stitch, in the round, until the bag portion is complete. Half of the stitches are bound off, using Color A for a secret flash of color. The flap is produced by working the remaining stitches flat, and then finished by attaching Color C, picking up stitches along the flap edges, and binding off with the I-cord Bind-off.
TECHNICAL TIP—All stitches are slipped purlwise, with the working yarn always held to the RS. Yarns not in use should be held to the left (inside of the bag) and only the working yarn should be held to the right (outside of the bag). When picking up a new color, consistently pick it up from under the old color. In order to avoid ladders between needles, pull allof the slack out of the working yarn when moving to the new needle. This is best done after the needle tip has been inserted into the next knit stitch, but before wrapping and knitting the stitch. Don’t be afraid to pull very firmly! Slip the next stitch and repeat the insertion and firm pull when working the second knit stitch. Work remainder of round as usual.

Body
Using larger needle, Color A, and Judy’s Magic CO method, CO 103 sts.
Knit 1 rnd, correcting any incorrect st mounts (leading leg in back) by knitting tbl.
Work Three-Color Linen Stitch (in the round) for 4”, ending with Rnd 3 of pat.
Next Rnd: With Color A, knit across the 51 sts on the front needle, cont working in pat as est across the 52 sts on the back needle. Cut Color B, leaving a 6” tail.
TECHNICAL TIP—Make firm and consistent flap selvedge edges by always picking up the new color from under the old one and pulling out all of the slack by inserting the needle tip into the first stitch and firmly pulling out the slack before wrapping and knitting or purling the stitch, slipping the next stitch (wyif or wyib), and then repeating the insertion and firm pull before working the second stitch. Work remainder of row as usual.


Flap
BO Rnd: Using smaller needle and 2-st I-Cord BO method, BO all sts on the front needle, attach Color B and, with larger needle, work Row 1 of Three-Color Linen Stitch (flat) across sts on the back needle.
Work Row 2 of pat.
Attach Color A and work Row 3 of pat.
Cont working in pat as est until flap measures 3.25” from BO rnd, ending with Row 1.
Flap Edging
Cut all colors, leaving 6” tails.
With RS of back and open flap facing you, and with smaller needles and Color C, pick up and knit 22 sts along flap side edge, knit across 52 sts along flap lower edge, pick up and knit 22 sts along remaining flap side edge—96 sts.
Purl next row.
TECHNICAL TIP—Draw up a Magic Loop of the circular cable at the turning of each flap corner to make it easier to purl along the 3 flap edges.
Using 3-Stitch I-Cord BO method, BO all sts.
 Finishing
Weave in all ends, taking care to tack down the ends of the I-cord edging and to keep the weaves as invisible as possible on the inside of the flap.
Block to measurements, squaring off the flap and body corners.
Sew button at center of RS of flap, approx 1.25” from lower flap edge, or where desired.
Sew male snap piece to WS of flap directly behind button. Sew female snap piece to RS of body.


Copyright 2021, The Knitting Guild Association, Cast On Winter 2020-2021, All Rights Reserved
*Stash Pattern
0 Comment