No products in the cart.
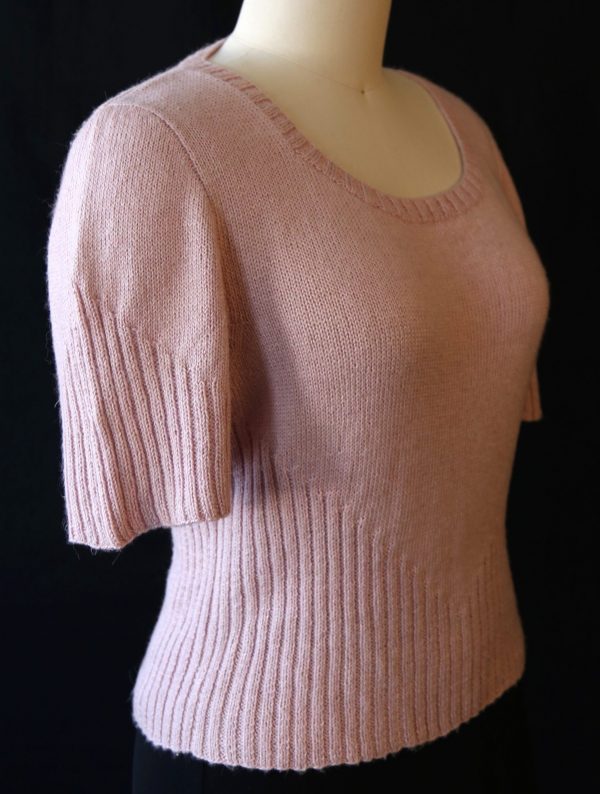
Abalone by Arenda Holladay
Confident Beginner Summer 2022


Beyond the Pattern
This sweater accompanies the Skill Building article that discusses how to seam ribbing. The bottom of the sweater is ribbed for several inches, and then the ribbing is gradually changed to stockinette, which transforms the basic silhouette into a fitted garment.
When the sweater is blocked, you have a choice. If you do not stretch out and pin the ribbed section, the ribbing will retain its texture and hug the body. If you block the ribbed section firmly, the sweater will be loose around the midsection, and the ribbed section provides an embossed design.
The short sleeves are worked from the top down with short-row shaping. As the sleeves are worked, ribbing is added to match the ribbing design at the bottom of the sweater. Note that the schematic does not include the sleeves. Due to this construction, the measurements depend upon your row gauge. You determine the length you want as well.
Sizes
XS (S, M, L) [1X, 2X, 3X] {4X, 5X, 6X}
Finished Measurements
Chest: 26 (31, 36, 41) [46, 51, 56] {61, 66, 70.5}”
Length: 18.5 (18.5, 20, 20) [22, 22, 24] {25, 27, 28.5}”
Materials
HiKoo RYLIE (274yds/250m, 100g/3.5oz, 50% Baby Alpaca, 25% Mulberry Silk, 25% Linen): 2 (3, 3, 4) [4, 5, 5] {6, 7, 8} skeins #093 Abalone
Size 3 (3.25mm) needles or size needed to obtain gauge
Stitch markers
Row markers
Tapestry needle
Gauge
In St st, 26 sts & 36 rnds = 4″/10cm. To save time, take time to check gauge.
DESIGNER NOTE—K2P2 ribbing is worked at the bottom of the sweater. Once it is complete, a marker is placed on either side of the center column of reverse stockinette; and on the next row, knit stitches are worked at the top of that column. This leaves 11 (13, 15, 17) [19, 21, 23] {25, 27, 29} knit columns on either side of the center column of reverse stockinette. Working from the center out, reverse stockinette stitches are replaced with knit stitches at four row intervals. This produces a stair-step stitch pattern.

Back
Using the long-tail cast-on technique, CO 86 (102, 118, 134) [150, 166, 182] {198, 214, 230} sts.
Next Row (WS): P2, *k2, p2; rep from * to end.
Next Row (RS): *K2, p2; rep from * to last 2 sts, k2.
Work in pat as est until the ribbing measures 5.5 (4.75, 4.75, 4) [4, 3.25, 3.25] {3.5, 3.5, 3.5}”, ending with a RS row.
Next Row (WS): Work next 42 (50, 58, 66) [74, 82, 90] {98, 106, 114} sts in pat as est, pm, k2, pm, work to end of row.
DESIGNER NOTE—The stair-step pattern is set on the next row. Stitches up to the first marker are worked in ribbing, but the next two stitches (between the markers) are knit instead of purled. This is repeated every fourth row on the reverse stockinette columns on either side of the center. It is suggested that as you work the knit stitches on the reverse stockinette columns, that you place markers four stitches to the right and left of the new knit stitches.

Next Row (RS): Work in pat as est to 4 sts before first marker, pm, work to first marker, rm, k2, rm, work next 4 sts, pm, work to end of row. Work 3 rows in pat as est.
Pat Row (RS): Work in pat as est to 4 sts before first marker, pm, work to first marker, rm, knit to next marker, work next 4 sts in pat as est, pm, work in pat to end of row.
Work 3 rows in pat as est.
Rep last 4 rows until all columns of rev St st are knit.
Work 3 more rows, ending with a WS row.
TECHNICAL TIP—The pattern specifies the length of the armhole opening in inches since row gauge can vary for knitters. Since the sleeves are worked top down using a short-row technique, it will be MUCH EASIER to work the sleeves if there are exactly the same number of rows on the back and front from the armholes to the shoulders. Use safety pins, row markers, or a lifeline to mark the first row of the armhole opening on both sides. When working the armhole openings, count rows.
Armhole Shaping
BO 3 (4, 5, 6) [7, 7, 7] {7, 8, 8} sts at each armhole edge, then 3 (3, 4, 6) [6, 6, 7] {7, 8, 8} sts, then 0 (0, 0, 2) [3, 4, 5] {5, 6, 8} sts, then dec 1 st at each armhole edge every RS row 4 times—66 (80, 92, 98) [110, 124, 136] {152, 162, 174} sts.
Work even until armhole measures 8.5 (8.5, 9, 9) [10, 10, 11] {11, 12, 12}”. BO.
DESIGNER NOTE—The front is worked the same as the back until the armhole shaping.
Front
Work as for the Back until the Armhole Shaping.
Armhole Shaping
BO 3 (4, 5, 6) [7, 7, 7] {7, 8, 8} sts at each armhole edge, then 3 (3, 4, 6) [6, 6, 7] {7, 8, 8} sts, then 0 (0, 0, 2) [3, 4, 5] {5, 7, 8} sts, then dec 1 st at each armhole edge every RS row 4 times—66 (80, 92, 98) [110, 124, 136] {152, 162, 174} sts. AT THE SAME TIME, when the piece measures 13.5 (13.5, 14, 14) [16, 16, 18] {19, 20, 21}” begin neck shaping.

Neck Shaping
Next Row (RS): K26 (32, 37, 39) [45, 51, 56] {63, 67, 72}, BO 14 (16, 18, 20) [20, 22, 24] {26, 28, 30} sts, work to the end of the row.
Working each side separately, at each neck edge BO 5 sts 2 (2, 2, 2) [2, 3, 3] {4, 4, 4} times, then 2 sts 3 (4, 5, 5) [6, 4, 5] {3, 4, 4} times—10 (14, 17, 19) [23, 28, 31] {37, 39, 44} sts rem on each shoulder.
Work even until piece measures 18.5 (18.5, 20, 20) [22, 22, 24] {25, 27, 28.5}”. BO.
DESIGNER NOTE—Once the front and back are complete, block them before beginning the sleeves. Take care not to stretch out the ribbing if you want a more fitted sweater.
Finishing Part 1
Block the front and back. Seam the shoulders and side seams.
DESIGNER NOTE—The sleeves are worked top down using the method and terminology, with some modifications, described in Top Down, Reimagining Set-In Sleeve Design by Elizabeth Doherty. This process involves picking up stitches around the armhole, beginning where the upper sleeve cap begins.
TECHNICAL TIPS—Generally, when you are picking up stitches along a selvedge edge, you use the ratio of the number of stitches per inch to the number of rows per inch. This is the ratio you will use for the upper cap of the sleeve. For the rest of the cap, you will use a very different ratio. Count the number of rows from the top of the sleeve cap to the bound-off stitches at the bottom of the sleeve. To ensure that the fabric does not pucker when working the short rows that shape the sleeve, you need to pick up only half that number, plus a few extra. For example, if there are 50 rows, you would pick up 26 or 27 stitches. It is important that you pick up the same number of stitches on both sides of the sleeve. For the underarm, pick up one stitch for every bound-off stitch.
After the short row pattern is established, a ribbing pattern is started and maintained until the sleeve is complete. A unique marker—center marker—is placed at the shoulder seam to be used later to indicate where the ribbing pattern starts and should not be confused with the markers for the short rows.
Sleeves
With a ruler, measure 1 (1.25, 1.25, 1.5) [1.5, 1.75, 1.75] {2, 2, 2.25}” to the right of the shoulder seam, and from this spot pick up sts around the armhole as follows: Pick up sts to the shoulder seam using the ratio of 4 sts for every 6 rows, pm. Pick up exactly the same number of sts on the other side of the shoulder seam, pm. (This is the upper cap.) Place the unique center marker at the shoulder seam. Next, pick up one st every other row, plus an extra st or two, to the bottom of the armhole, pm. Pick up one st for each bound-off st at the bottom of the armhole, pm. Pick up exactly the same number of sts on the other side of the armhole, pm.
TECHNICAL TIP—Short rows are worked until the bottom of the armhole when the sleeve is worked in the round. There are many ways to work short rows. For this pattern, the wrap-and-turn method is recommended. The rows are turned at the selvedges. Work the wrapped stitches before the next wrap-and-turn.
DESIGNER NOTES—To shape the cap for the shoulder, after the first two short rows, it is necessary to work one stitch normally AFTER the wrapped stitch and then to wrap and turn the next stitch.
Sleeve Cap Top
Row 1 (RS): Work in pat to marker, rm, sl and wrap the next st, and turn.
Row 2 (WS): Work in pat to the marker, rm, sl and wrap the next st, and turn.
Row 3: Work in pat as est to the wrapped st, knit the wrapped st, k1, sl and wrap the next st, turn.
Row 4: Work in pat as est to the wrapped st, purl the wrapped st, p1, sl and wrap the next st, turn.
Rep Rows 3 and 4 two more times.
DESIGNER NOTE—The instructions below apply to all of the stitches until only 10 stitches remain before the marker at the bottom of the sleeve.

Sleeve Cap Sides
Row 1 (RS): Work in pat as est, knit the wrapped st, sl and wrap the next st, turn.
Row 2 (WS): Work in pat as est, purl the wrapped st, sl and wrap the next st, turn.
Rep Rows 1 and 2 until 10 sts before the marker at the bottom of the sleeve.
DESIGNER NOTE—The ribbing pattern on the sleeve is a reversal of the ribbing pattern on the bottom of the back and front where knit stitches were worked to end the reverse stockinette stitch columns. On the sleeve, reverse stockinette stitches are worked to establish the stitch columns. A marker is placed before the first stitch to be purled, and the center marker is moved to after the second purl.
Est Pat: Work even to 1 st before the center marker, pm, p1, rm, p1, pm, work to the end of the row working the short rows as above. Work 3 rows.
Pat Row (RS): Work in pat as est to 4 sts before first marker, pm, p2, k2, rm, p2, rm, k2, p2, pm, work to end of row. Work 3 rows in pat as est.
Use this basic procedure to add columns of reverse stockinette stitch at both sides of the center. AT THE SAME TIME when there are 5 sts before the marker at the sleeve bottom, follow the instructions for the Sleeve Bottom.
DESIGNER NOTE—Decreases need to be made near the bottom of the sleeve so it does not pucker. This occurs approximately where decreases were made to shape the armhole of the back and front. To do this, 2 stitches are wrapped at the same time; and when they are worked, they are knit together along with the wraps. Take care to maintain the ribbed pattern, adding new reverse stockinette stitch columns every fourth row.
Sleeve Bottom
Row 1 (RS): Work in pat as est to wrapped st, knit the wrapped st, sl and wrap the next 2 sts tog, turn.
Row 2 (WS): Work in pat as est to wrapped st, purl the wrapped st, sl and wrap the next 2 sts, turn.
Row 3: Work in pat as est to wrapped sts, knit the 2 wrapped sts tog, sl and wrap the next 2 sts tog, turn.
Row 4: Work in pat as est to wrapped sts, purl the 2 wrapped sts tog, sl and wrap the next 2 sts tog, turn.
Rep Rows 3 and 4 three more times. Work 2 more single wrap-and-turns.
DESIGNER NOTE—After the last wrap-and-turn, the sleeve is worked in the round. Work the last wrapped stitch. Place a marker at the center of the “seam” for the sleeve to indicate the beginning of the round. Decreases to shape the sleeve are worked next to this “seam.”
Work 2 rnds in pat as est.
Dec Rnd: Work to 3 sts before marker, ssk, k2, k2tog.
DESIGNER NOTE—For the ribbed pattern to continue over the “seam,” it is necessary to have a multiple of 4 stitches when the final rounds are worked. You may want to count your stitches at this point to determine how many decreases you need to make to have a multiple of four. For the sample, four sets of decreases were necessary. You may need more.
Rep Dec Rnd every other rnd (at least 3 more times) until the total number of sts is a multiple of 4. Cont to add columns of rev St sts until all the sts are ribbed.
DESIGNER NOTE—One of the joys of top-down sleeves is that you can try the sweater on while in progress. For the sample, 8 rounds of ribbing were worked, and then the stitches were bound off. If you want a longer sleeve, work additional rounds.
Work in ribbing until the desired length is reached. BO.
Rep for the second sleeve.
Finishing Part 2
DESIGNER NOTE—The K2P2 neckband is worked when the sleeves are complete. It requires a multiple of 4 stitches for the pattern to be complete. Consider placing markers every 20 stitches as you pick up stitches. If you have extra stitches, you can decrease a few as you work the first round.
Neckband
Beg at the left shoulder, pick up a multiple of 4 sts around neckline. Refer to the Designer Note above if you have extra stitches. Work 8 rnds in K2P2 ribbing.
Block and weave in all yarn tails.

Article Associated with Pattern — K2P2 Ribbing
Free Resources – Download Free Pattern
Copyright 2022, The Knitting Guild Association, Cast On Summer 2022, All Rights Reserved