No products in the cart.
Caret Tunic by Arenda Holladay

 Beyond the Pattern
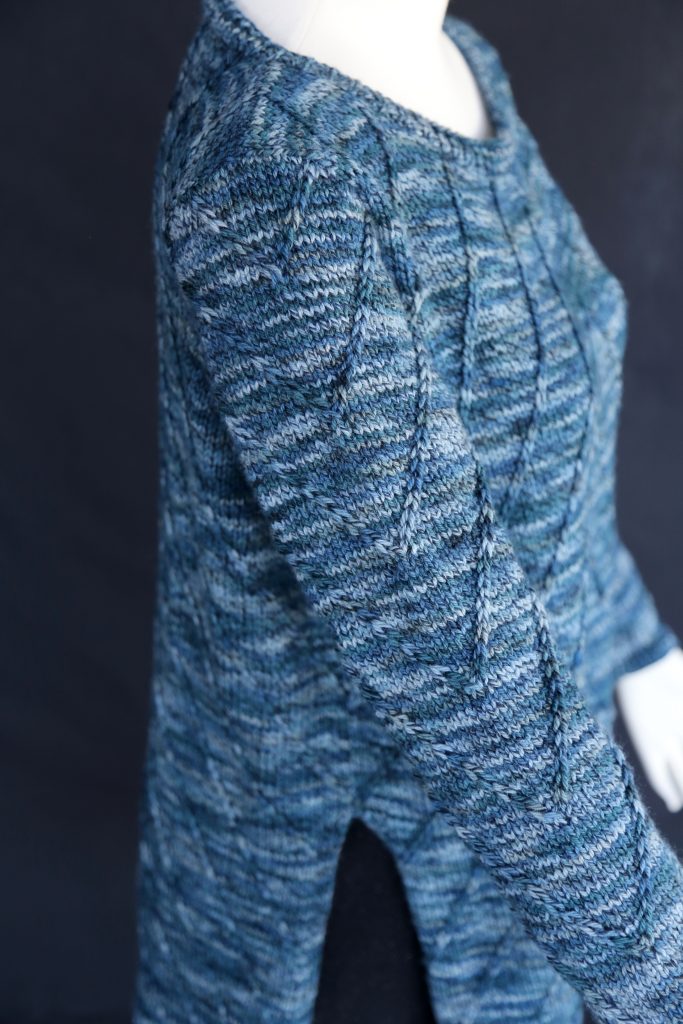
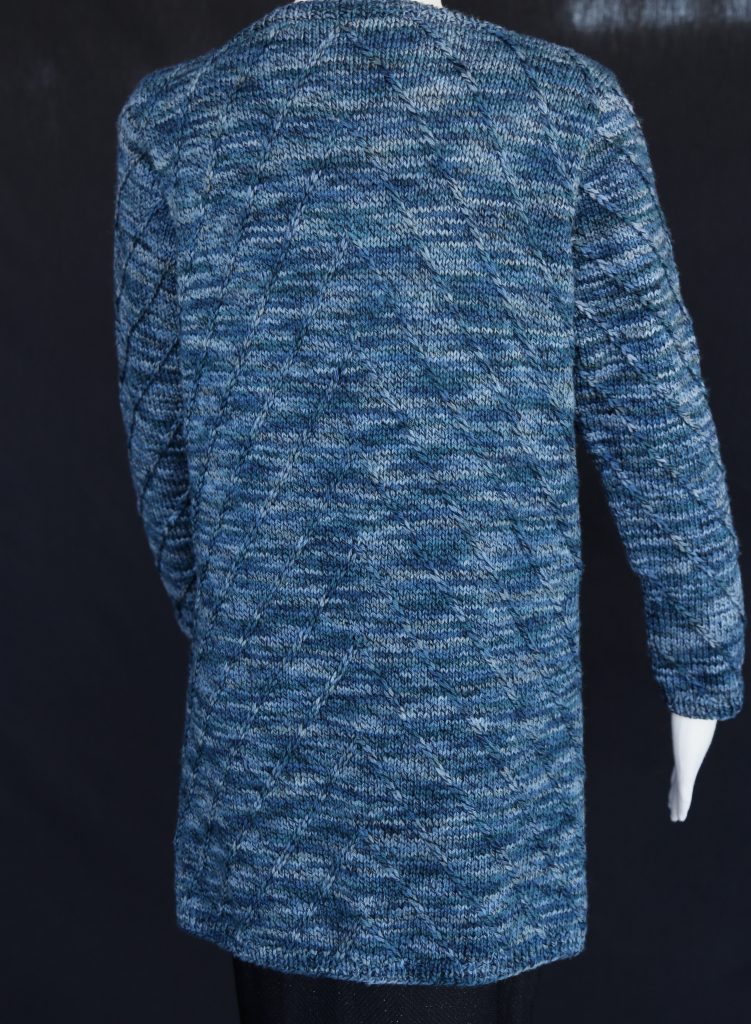
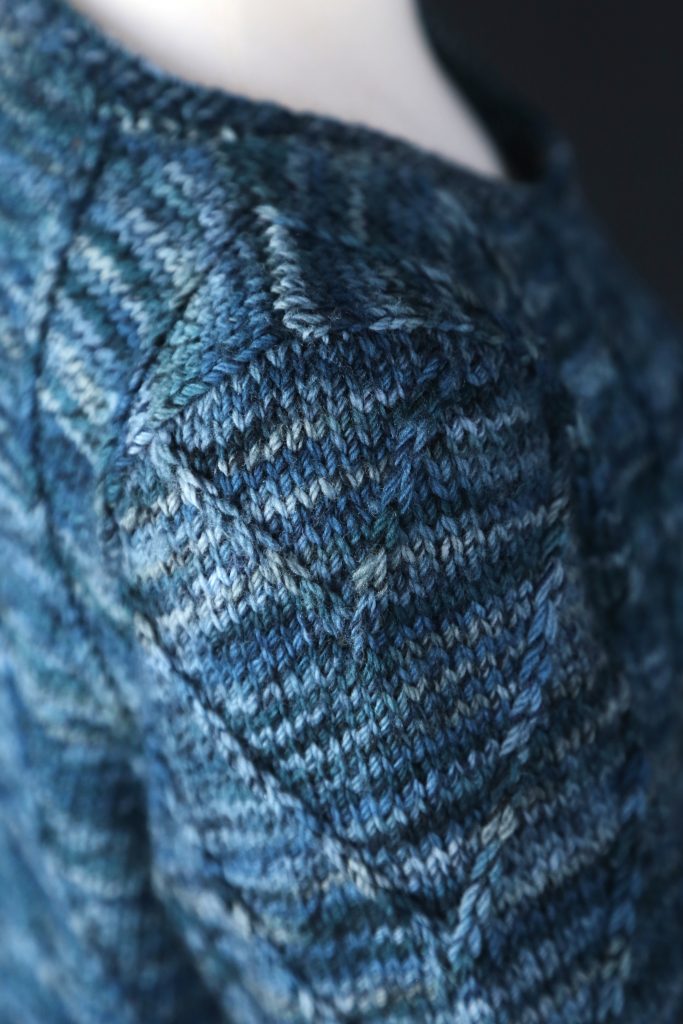
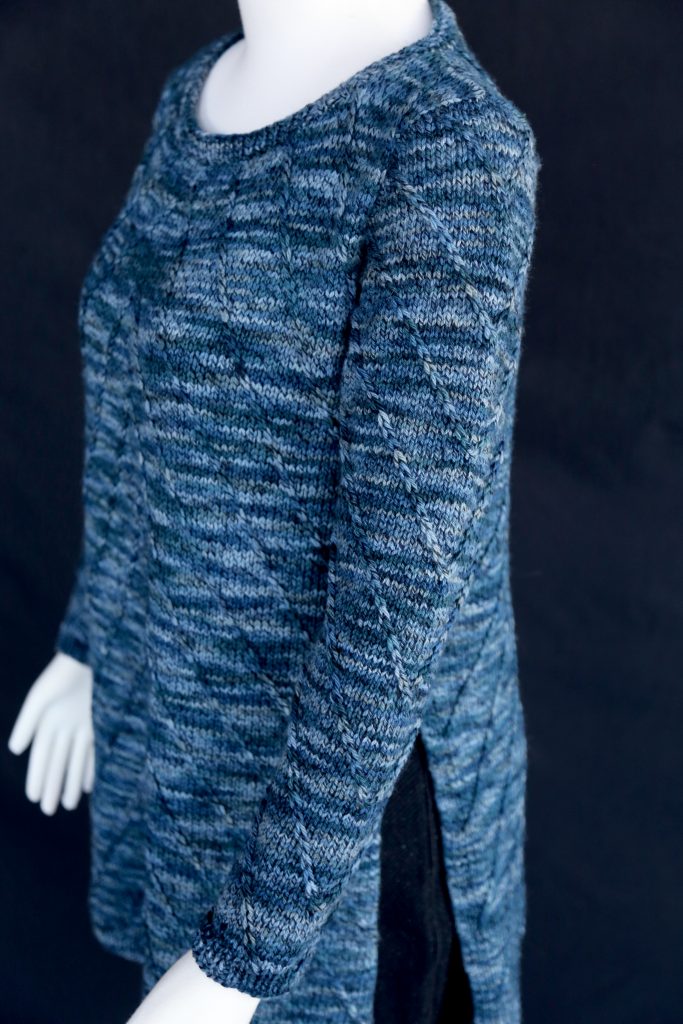
This tunic features an allover slip-stitch pattern to create diagonal lines which meet in the center. I think they look like carets, the proofreading mark to indicate an addition to the text; hence, the name of the tunic. The tunic is worked from the bottom up, and the sides are ribbed to the waist as a border for the side vents. The sleeves are worked top-down with short rows. I love this construction for set-in sleeves as you can try it on as you go. (Before I started using this technique, the sleeves in my sweaters were always a bit too short.)
Since this tunic is designed to be worn loosely over clothes, the finished measurements reflect 4″ of positive ease.
Sizes
XS (S, M, L, 1X, 2X)
Finished Measurements
Chest: 34 (38, 42, 46, 50, 54)”
Length: 28.5 (29.5, 30.5, 31.5, 32.5, 33.5)”
Materials
Briar Rose Fibers FOURTH OF JULY (550yds/502m, 227g/8oz, 100% Merino Wool): 2 (2, 3, 3, 3, 4) skeins #1818
Size 5 (3.75mm) needle for picking up sleeve stitches only
Size 7 (4.50mm) needles or size needed to obtain gauge
Stitch markers
Tapestry needle
Gauge
In Caret Slipped St pat, 20 sts & 26 rows = 4″/10cm. To save time, take time to check gauge.
Abbreviations*
Left Slip—Slip 1 st to cn and hold to front. Knit 1 st, then slip st from cn to right needle.
Right Slip—Slip 1 st to cn and hold to back. Slip next st from left needle to right needle, then knit st from cn.
Slipped CDD—Slip 2 sts to right needle, pass first st over second st. Slip st on left needle knitwise and return to needle to adjust st mount. Slip st on right needle to left, pass second stitch on left needle over the first st. (Before returning stitch to right needle, make a yarnover, purl the next stitch, make a second yarnover.)
*This video shows how to work the Left and Right Slip as well as how to work the Slipped CDD.
Stitch Pattern
See the Caret Charts A, B, and C
DESIGNER NOTE—The bottom border is K1P1 ribbing. When the bottom border measures 0.75″, the Caret Slipped Stitch pattern is worked between the five ribbed stitches at each selvedge. These ribbed stitches provide a border for the side vents. To prepare for the first pattern row, the first row after the border, a WS row, is purled. Markers are placed to separate the ribbing at the selvedges.
 Back
Back
Using the long-tail cast on, CO 87 (95, 103, 111, 119, 127).
Next Row (WS): *K1, p1; rep from * to last st, k1. Work in pat as est until border measures 0.75″ ending on a RS row.
Next Row (WS): K1, (p1, k1) twice, pm, p77 (85, 93, 101, 109, 117), (k1, p1) twice, k1.
Est Pat (RS): P1, (k1, p1) twice, k2 (6, 0, 4, 8, 2), work sts from Caret Chart A 2 (2, 3, 3, 3, 4) times, work sts from Caret Chart B once, work sts from Caret Chart C 2 (2, 3, 3, 3, 4) times, k2 (6, 0, 4, 8, 2), (p1, k1) twice, p1.
Work sts from Caret Charts A, B, and C until the piece measures 13″, ending on a WS row.
DESIGNER NOTE—In the pattern, the vent ends at the waist. A stitch is added at each selvedge for the seam allowance, and the Caret Slipped Stitch pattern is worked over the ribbed stitches. Incorporate these 10 stitches into pattern. Do not include the selvedge stitches in the pattern.
Next Row (RS): Using the cable cast-on technique, CO 1 st, k6 (the new st and the next 5 sts), work in pat as est to the last 5 sts, k5.
Next Row (WS): Using the cable cast-on technique, CO 1, purl to the end of the row—89 (97, 105, 113, 121, 129).
Work in pat as est, incorporating the 10 sts at the top of the vent into the pat until the piece measures 20.5 (21, 21.5, 22, 22.5, 23)”, ending on a WS row.
DESIGNER NOTE—The armholes are shaped by a series of bound-off stitches and then decreased stitches. Work the decreases one stitch in from the selvedge.
Armhole Shaping
At each armhole edge, BO 5 sts, then BO 0 (4, 4, 4, 4, 4) sts, then BO 2 sts 2 times, then dec 1 st each edge every row 2 (0, 2, 4, 6, 8) times—67 (71, 75, 79, 83, 87) sts rem.
Work in pat as est until armhole measures 8 (8.5, 9, 9.5, 10, 10.5)”. BO.
Front
Work as for Back until armhole measures 4 (4, 5, 5, 6, 6)” ending on a WS row.
Neckline Shaping
K27 (28, 29, 30, 31, 32), BO 13 (15, 17, 19, 21, 23) sts, work to end of row. Working each side separately, at each neckline edge, BO 6 sts, then BO 3 sts, then BO 2 sts twice—14 (15, 16, 17, 18, 19) sts rem.
Work until armhole measures 8 (8.5, 9, 9.5, 10, 10.5)”. BO rem sts.
Finishing Part 1
Block. Seam the shoulders and the sides, taking care to line up the slipped stitches at the seam.
DESIGNER NOTE—The sleeves are worked top down using the method and terminology described in Top Down, Reimagining Set-In Sleeve Design by Elizabeth Doherty, with some modifications. This process involves picking up stitches around the armhole, beginning where the upper sleeve cap begins, about 1-2″ to the right of the shoulder seam. Since row gauge can vary, this pattern does not supply the exact number of stitches to pick up but rather the ratios to use. It is important to follow these guidelines for the sleeve to fit properly.
TECHNICAL TIP—Generally, when you are picking up stitches along a selvedge edge, you use the ratio of the number of stitches per inch to the number of rows per inch. This is the ratio you will use for the upper cap of the sleeve. For the rest of the cap, you will use a very different ratio. Count the number of rows from the top of the sleeve cap to the 10 bound-off stitches at the bottom of the sleeve. To ensure that the fabric does not pucker when working the short rows that shape the sleeve, you need to pick up only half of that number plus a few extra. For example, if there are 50 rows, you would pick up 26 or 27 stitches. It is important that you pick up the same number of stitches on both sides of the sleeve. For the underarm, pick up one stitch for every bound-off stitch.
At the top of the sleeve cap, be sure to pick up a stitch in the seam itself. The Caret Slipped Stitch pattern is worked on the sleeve and requires an uneven number of stitches.
 Sleeves
With a ruler, measure 1 (1.25, 1.5, 1.75, 2, 2.25)” to the right of the shoulder seam and from this spot, using the smaller needle, pick up sts around the armhole as follows: Pick up sts to the shoulder seam using the ratio of 4 sts for every 6 rows. Pick up 1 st at the shoulder seam. Pick up exactly the same number of sts on the other side of the shoulder seam, pm. (This is the upper cap.) Next, pick up one st every other row, plus an extra st or two, to the bottom of the armhole, pm. Pick up one st for each bound-off st at the bottom of the armhole, pm. Pick up exactly the same number of sts on the other side of the armhole, pm.
TECHNICAL TIP—Short rows are worked until the bottom of the armhole when the sleeve is worked in the round. There are many ways to work short rows. For this pattern, the wrap-and-turn method is recommended. The rows are turned at the selvedges. Work the wrapped stitches before the next wrap-and-turn.
DESIGNER NOTES—To shape the cap for the shoulder, after the first two short rows, it is necessary to work one stitch normally AFTER the wrapped stitch and then to wrap and turn the next stitch.
Sleeve Cap Top
Row 1 (RS): Using larger needle, knit to marker, wrap and turn, remove marker.
Row 2 (WS): Purl to marker, wrap and turn, remove marker.
Row 3: Knit to wrapped st, work the wrap with the st, k1, wrap next st, turn.
Row 4: Purl to wrapped st, work the wrap with the st, p1, wrap next st, turn.
Rep Rows 3 & 4 two more times, maintaining St st pat.
DESIGNER NOTE—The stitches next to the “seam” of the sleeve and the body are the wrapped stitches from the short rows. It can be difficult to slip these stitches for the Caret Slipped Stitch pattern. On the sample, I worked the slip stitches one or two stitches from the wrapped stitches. For that reason, the directions state to work the stitches from the chart when there are approximately 19 stitches on the sleeve cap. When you have 17 or 19 stitches, look at the work and decide when to begin the pattern. The important thing is that the diagonal lines meet up at the center of the sleeve.
AT THE SAME TIME, when there are 17 or 19 sts in the sleeve cap, work the sts of the Sleeve Cap Chart. As the short rows are completed and the stitch count increases, incorporate the new stitches into the Caret Slipped Stitch pattern.
Sleeve Cap Sides
Row 1 (RS): Knit to wrapped st, work the wrap with the st, wrap next st, turn.
Row 2 (WS): Purl to wrapped st, work the wrap with the st, wrap next st, turn.
Rep Rows 1 & 2 until 5 sts before the marker at the bottom of the sleeve.
DESIGNER NOTE—Decreases need to be made near the bottom of the sleeve cap so it does not pucker. This occurs approximately where decreases were made to shape the armhole of the back and fronts. To do this, two stitches are wrapped at the same time; and when they are worked, they are knit together along with the wraps.
 Sleeve Cap Bottom
Row 1 (RS): Knit to wrapped st, work the wrap with the st, wrap next 2 sts tog, turn.
Row 2 (WS): Purl to wrapped st, work the wrap with the st, wrap next 2 sts, turn.
Row 3: Knit to wrapped sts, knit the two wrapped sts tog while working the wrap, wrap next 2 sts tog, turn.
Row 4: Purl to wrapped sts, purl the two wrapped sts tog while working the wrap, wrap next 2 sts tog, turn.
Rep Rows 3 & 4 two more times. Work 2 more single wrap-and-turns.
DESIGNER NOTE—After the last wrap-and-turn, the sleeve is worked in the round. Work the last wrapped stitch. Place a marker at the center of the “seam” for the sleeve. Decreases are worked two stitches away from either side of this marker. Since the number of stitches in the sleeves depends upon the row gauge—which can vary from knitter to knitter—the pattern does not specify a specific number of final decreases but rather the number of stitches for the bottom of the sleeve.
Work in the rnd in in pat as est until the sleeve measures 1″ from the armhole, ending at the marker.
DESIGNER NOTE—The sleeve is designed to be fairly tight from the elbow to the wrist. If you want it wider, work fewer decreases. A K1P1 ribbed cuff is worked to match the band at the bottom of the sweater. The stitch pattern requires an uneven number of stitches. One stitch must be decreased before working the cuff.
Dec Rnd: *K1, ssk, work to 3 sts before marker, k2tog, k2.
Rep Dec Rnd every 4th rnd—until 43 (43, 47, 47, 51, 51) sts rem. Work in pat as est until the sleeve measures 15 (15.5, 16, 16.5, 17, 17.5)” ending 2 sts before the marker. Dec 1 st.
Cuff
Work 0.75″ in K1P1 ribbing. BO in pat.
Finishing Part 2
Neckband
Beg at the left shoulder seam, pick up an even number of sts around neckline, pm. Work 0.75″ in K1P1 ribbing. BO in pat.
Block and weave in all yarn tails.
![]()
![]()
![]()
![]()
![]()
![]()
Copyright 2020, The Knitting Guild Association, Cast On Winter 2019-2020, All Rights Reserved